This time of the year is full of fun fall treats. But sometimes, its nice to have something other than pumpkin, ginger, and peppermint. I'm talking about something that quickly jumps into our lives at the end of the winter, making a short appearance, and than disappearing as quickly as it came. I'm talking about Girl Scout Cookies!
I was a Girl Scout for many many years. I joined as a Brownie... I think I was just entering 3 grade. In Brownies, I met some of my best friends (one of whom was my maid of honor this past spring), and after that first year I went to Girl Scout Camp. I continued though scouts way past an age where it was "cool" and went to camp every summer. When I turned 16 I became a camp counselor and later a camp lifeguard... in total I was part of the scouts for ~13 year!
Some areas call Samoas "Caramel deLites."
This is a travesty and there is nothing "lite" about these cookies!
Of course, along with camp-outs, silly songs, and crafts, I sold plenty of cookies. My favorites were always Samoa (purple on the order form and box) and Thin Mints (dark minty green). When the order forms arrived, the first day to sell was always a snowy day (providing pity purchases from some of our neighbors), and they arrived a few weeks later. Invariably, we ate all the cookies within a week or two (depending on how well my mom hid them). And that's one of the reason why camp was so much fun...
See, after cookies sales are done, there are always plenty of cases leftover that are given to the local camps as a special treat for the campers. Every summer, deep in the camp's freezers, there were boxes and boxes of yummy girl scout cookies!
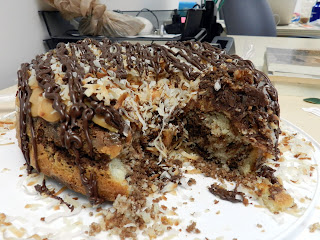
But alas, you are not a girl scout, nor a camper. And it is many months before you will have access to their amazing (albeit expensive cookies). So what should you do??? Make a Samoa Cake!!!
Samoa Cake
1 boxed white or yellow cake (with oil/egg/water as needed)
1/4 cocoa powered (optional)
3 cups coconut
Caramel Frosting (see below)
8 oz chocolate chips

First, prepare the cake batter as directed on the box. For a marbled cake, separate the batter into two bowl (roughly in half) and add the cocoa power to one bowl, mix to combine. Layer the batter into a (oiled and floured) bundt pan, and swirl it gently together. Bake as directed. Cool for a few minutes and then gently turn it out onto a plate.
In a 300 degree oven, toast the coconut (spread onto a large pan) for about 15 minutes, checking and stirring every few minutes. Meanwhile make the caramel frosting. When the cake is cool, frost it with the caramel frosting and pat the coconut into the frosting so that it sticks. Melt the chocolate chips, and drizzle the melted chocolate over the cake (this can be done easily by putting the chocolate into a plastic baggie, and cutting the tip off to use as a disposable pastry bag).
This cake makes a mess, but it is so yummy!


No comments:
Post a Comment