Search This Blog

Sunday, October 30, 2011

Happy Halloween! Glowing Frog Egg Drinks, Jack-O-Lantern Rice Crispy Treats, and Evil Bananas

Happy Halloween everyone!

I'm not a big Halloween person. I don't get dressed up. I don't decorate. I carved pumpkins two years ago and was all ready for trick-or-treaters, but no one came (I was very sad). But I do love Halloween foods and seeing little kids get all crazy for the holiday.

I was babysitting this weekend and I thought, "what would be more fun but to have a mini Halloween party ourselves?"

Spooky!

Glowing Frog Egg Drinks:
Clear (or nearly clear) drink (I used Diet Sprite - no sugar)
Club Soda (with quinine)
Bubbles/Tapioca pearls (see my post on bubble tea drinks)
Big straw
Black Light

Put the bubbles on the bottom of the glass, fill most of the way with selected drink and add a good splash of club soda. Under a black light, club soda glows blue. Makes for a great party drink (can be made in an adult version). Plus, the bubbles freaked the kids out.

Quote of the night, from a very honest 5 year old, "Amy, are you evil?"
My reply, "little bit."

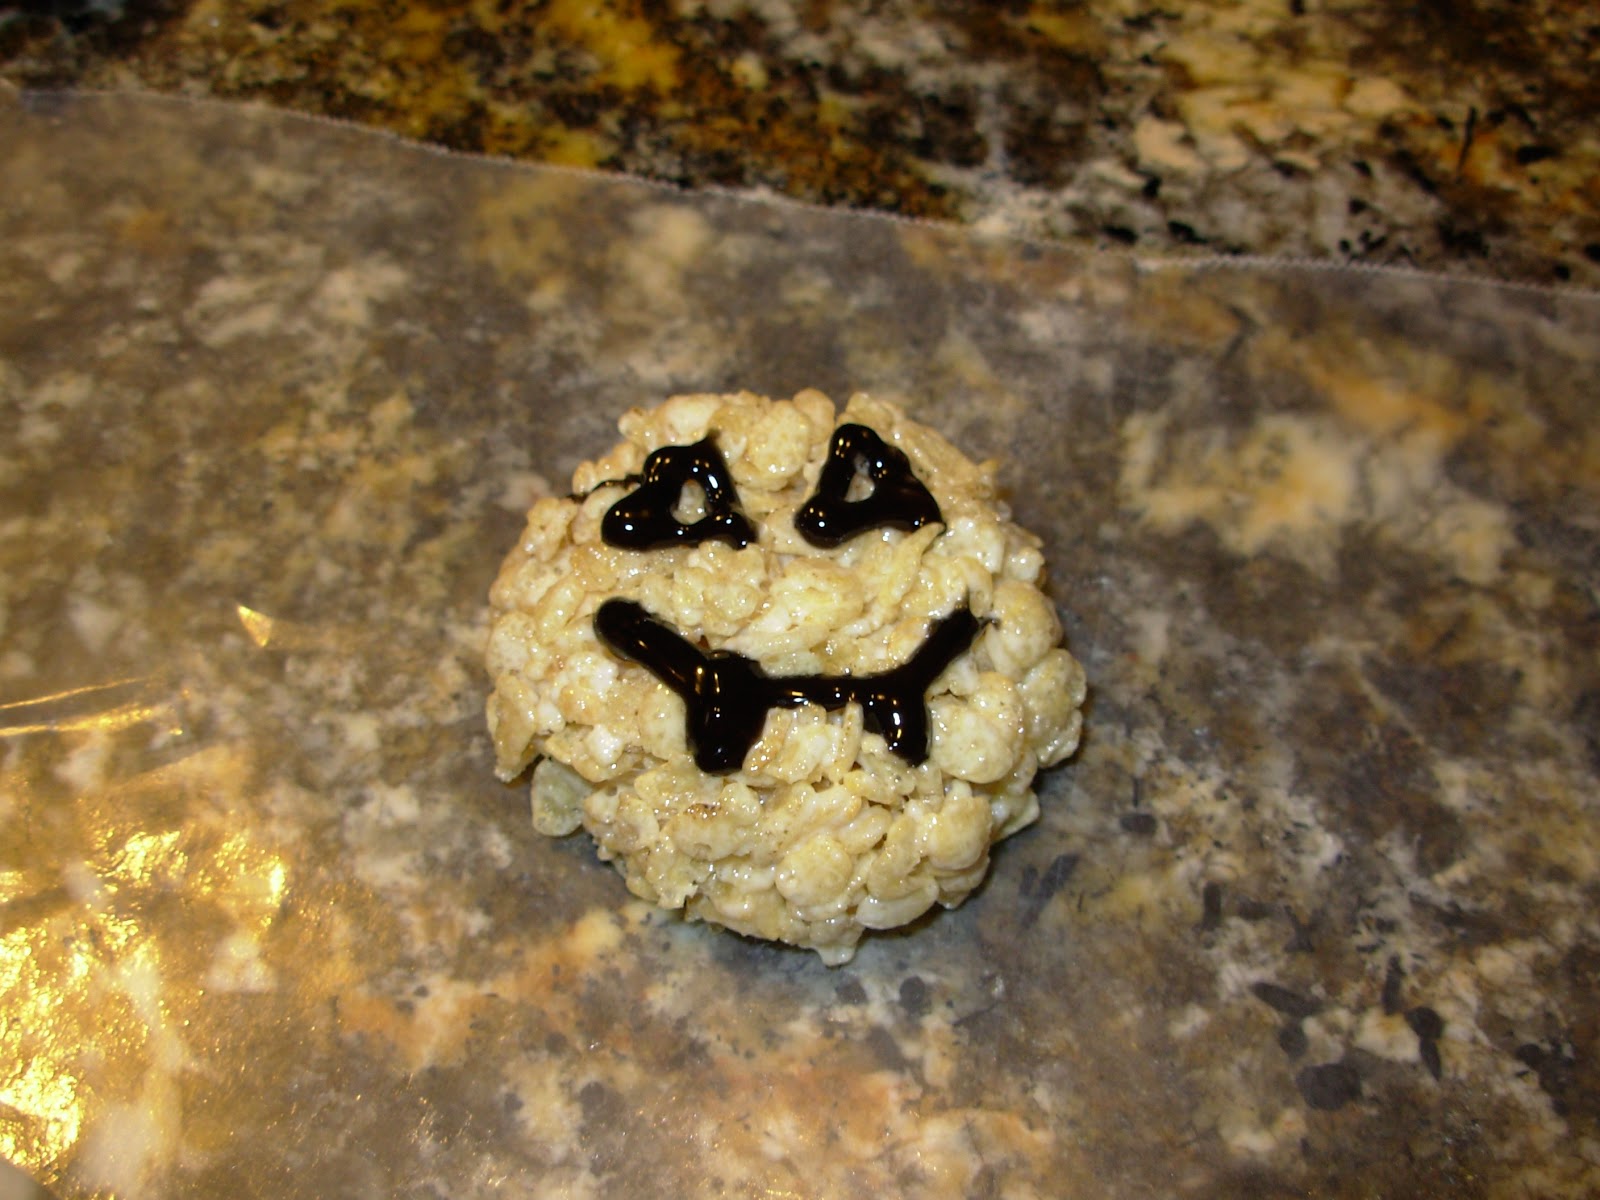
After they enjoyed their drinks (half the kids braved the "frog eggs") we made rice crispy treat jack-o-lanterns. I meant to bring orange food coloring, but I forgot. Oh well. These were still cute!


Rice Crispy Treats (adapted off the side of the box)
1 bag of large marshmallows
1 stick of butter
1 box of rice crispies

Melt to butter and marshmallows in a large bowl (Microwave, 2 minutes, stir half way). Add food coloring (optional). Carefully stir in cereal with a spatula or large spoon. Cool and make into pumpkins, either on wax paper or in hands. Use icing or sprinkles to make faces. Press the rest into a 9 x 9 pan to eat later.

Happy Pumpkin!

 The story behind the bananas:
I love this blogger called the Bloggess (bloggess.com). She tagged an idea that she wanted to do with her daughter that showed love notes sent to kids by writing on a banana. They're meant to be sweet and encouraging. Until the Bloggess discovered it. She wrote fun notes such as "act normal. you will be contacted with further instructions momentarily" on her husbands banana.

All you do is take a toothpick and gently write into the skin of just under-ripe bananas. As the banana ripens, the message will darken, leaving fun messages to whomever gets the banana. Muahahaha!

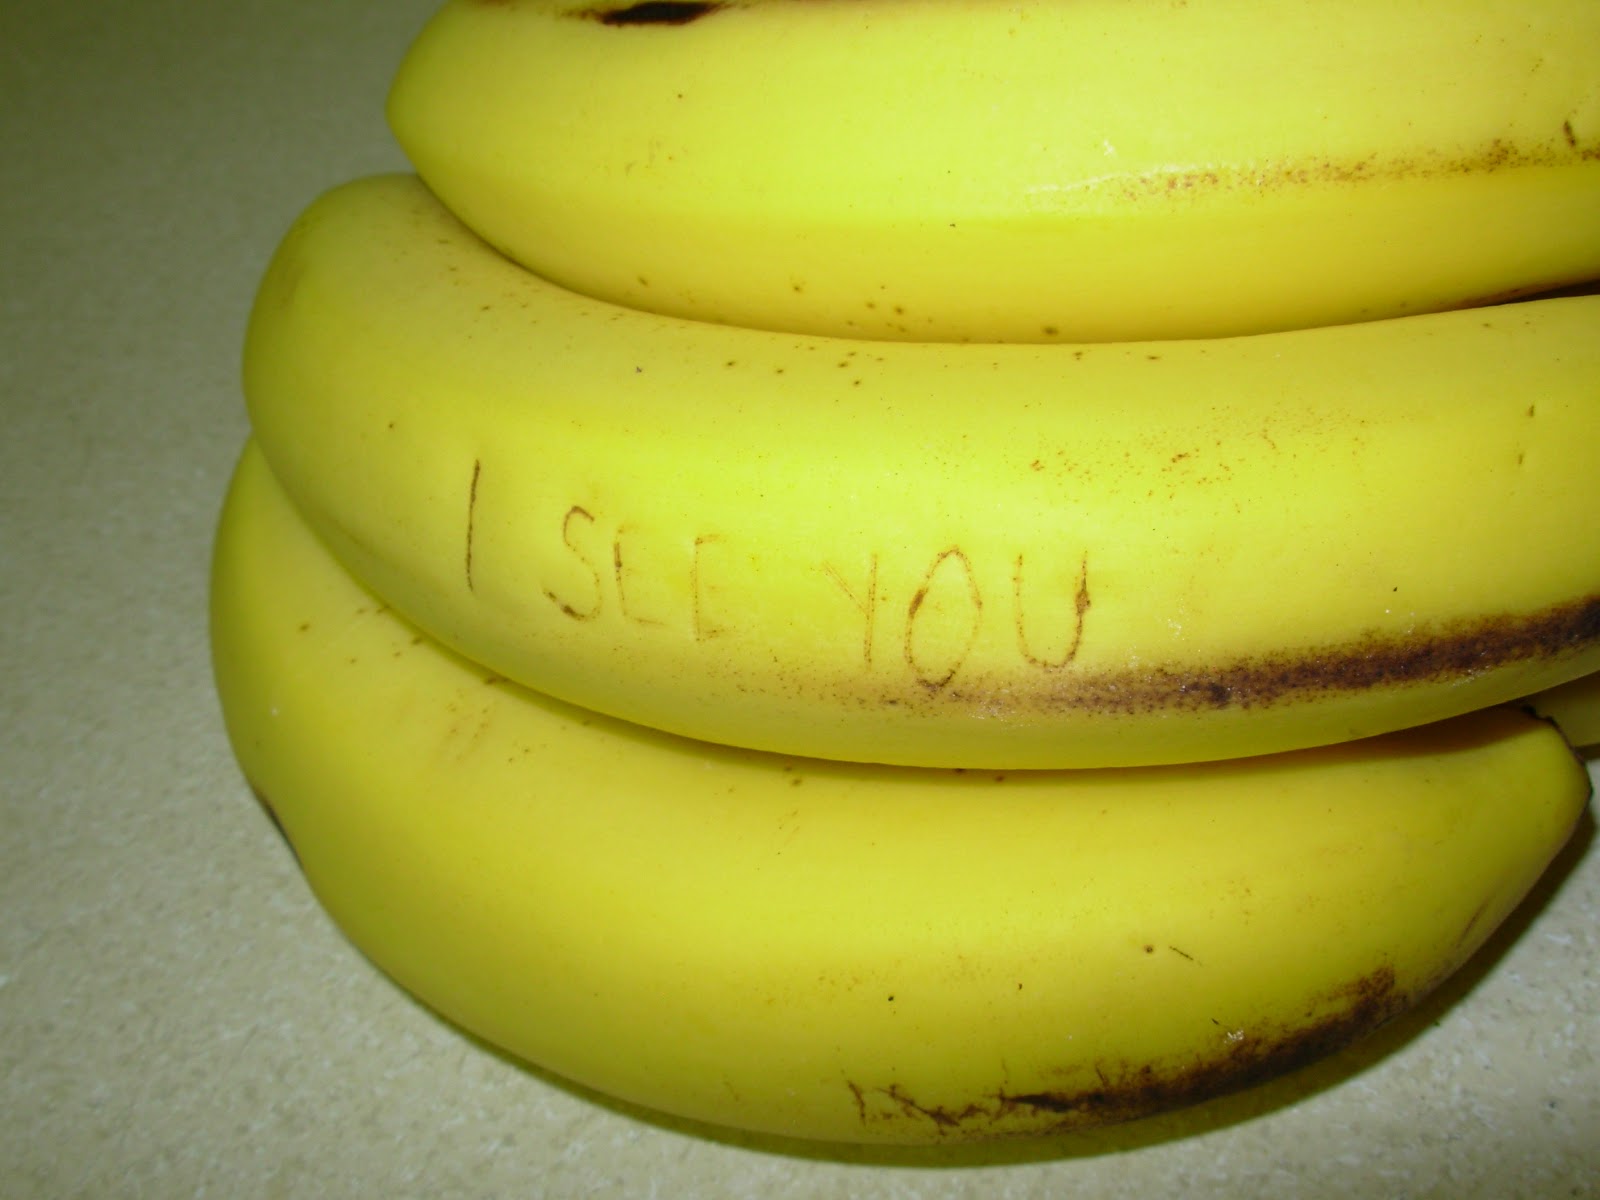
I find this incredibly hilarious.

Happy Halloween!!!

Wednesday, October 26, 2011

Mini Pumpkin Pie

Today we had a psychology brown bag meeting and I like to bake something as an incentive for people to attend.

Seeing that it's fall and because I love pumpkin, I decided to make mini pumpkin pies.

I didn't have much time, so instead of making pie crust and forming it into little tarts, I just picked up phyllo dough shells as a substitute.


Gold crust, creamy filling

Mini Pumpkin Pies:
3 packages of phyllo shells (45 pie-lets total), thawed
2 eggs
3/4 brown sugar
1 can (16oz) pumpkin puree
1/2 tsp salt
1 tsp cinnamon
1/2 tsp ginger (ground)
1/4 tsp cloves
1 can (12 oz) evaporated milk

Directions:
Preheat oven to 375 degrees, and place shells into mini-muffin pans or straight onto a baking sheet (I prefer the mini-muffin pans because it keeps them from tipping over). Beat the eggs lightly, and then add the rest of the ingredients and mix. Once the oven is up to temp, fill the shells to the top, and carefully put into the oven. Bake for 15-18 minutes, or until the filling doesn’t jiggle too much when the pan is shaken. Cool completely, then refrigerate.

This recipe makes quite a few, but they won’t last long

 So yummy!

Now, this filling recipe makes way too much for just 45 shells. A good solution is either making 90 mini pies, half the filling ingredients, or take the left over filling and bake it in custard cups (425 degrees for 15 minutes, then another 25-35 at 350 until its firm in the center).

Sunday, October 23, 2011

Spaghetti Squash and Puppy Chow

So I decided to take a risk and buy a spaghetti squash to make dinner. I kept reading about how easy it was to make and how it was so tasty. Now, I'm not a big fan of squash, except sweet uses of pumpkin, but I had recently, successfully, used a butternut squash to make fries (they tasted like sweet potato fries so it wasn't a huge leap), and I was feeling adventurous.

I saw the giant pile of squash at the supermarket the other day so I bought myself a large spaghetti squash.

How did I know which of the squash in the squash pile were spaghetti squash?

That's how.

On a quick side note, you could really mess up some novice cooks by swapping all the produce stickers. "Hey, I thought this was a hot house tomato, but the sticker says yellow onion... hmmmm."

How did I know I picked a good squash from the bunch? No clue. I just picked the prettiest one from the pile. There is probably some trick to picking a good one (heavy for its size, sounds hollow, I don't know), but just go with your gut.

After you bring your squash home (and possibly fielding a few questions from the cashier), prep is simple.

1. Disregard the instruction on the sticker that use just used to identify your squash. Its done enough.
2. Place the entire squash (yes, the whole thing. No, you don't have to poke holes in it but it can explode (I've had that happen and it makes quite the mess) into the microwave and cook for 8-10 minutes.
3. Use oven mitts to remove the squash from the microwave and carefully cut it open with a large knife. The skin should be pretty soft after cooking. Let the squash cool (or burn your hands. That's what I did).
4. Use a fork/spoon/any other utensil to remove the seeds and attached strands just like you would with a pumpkin.
5. Use a fork (yes, a fork this time) to pull apart the flesh of the squash. It should easily come out in long strands. If it is still hard in places, place flat down on the plate and microwave for another minute or two. Its not critical for it to come out perfectly. 


6. Use paper towel to pat as much liquid from the squash flesh as you can.
7. Take all the squash strands and put them in a non-stick skillet and cook with a little EVOO and garlic. Keep moving it around to get it cooked through.
8. Meanwhile, heat up whatever sauce you want to use. I used jar spaghetti sauce with polish kielbasa (its a Hansen family thing), but it would also be really good with sausage or ground beef. Or you could just go simple and toss it with garlic, oil, and parm.

Cooking it up

Yummm!

Surprisingly, this was a hit with both Chris and I. The squash really has an al dente angel hair texture and works great with the spaghetti sauce. I read that it only has about 60 calories per cup (I got about 5 cups out of my one squash) and is very high in vitamin B. 

I will definitively be making it again soon!

Puppy Chow:

I was feeling pretty good about myself and my healthy dinner last night so I decided to balance it out with this yummy treat.

1 cup chocolate chips
1/2 cup creamy peanut butter
~9 cups chex cereal (I prefer crispix)
1 1/2 - 2 cup powered sugar

First, melt the peanut butter and chocolate chips together in a large glass or plastic bowl in the microwave. Mix in the chex mix, then pour it all into a large ziplock bag. Add the powered sugar, close the bag, and shake it up until all the pieces are covered. 

Then, just gobble it up!

Puppy Chow: Not for Puppies.

Friday, October 14, 2011

Happy Birthday Ariel: Shirley Temple Cupcakes!

Admit it. You love Shirley temples. Sprite (or 7up), grenadine, and maraschino cherries. Such simple, syrupy awesomeness. All in honor of Ariel.


Ariel is one of my best friends. Always funny, energetic, and easy to talk to. We cause chaos where ever we go. Shirley temples are one of her favorite things, so these cupcakes were made for her.

I made a batch of Shirley temple cupcakes for Ariel last year and they tasted good but the look and texture wasn't right. They were a little orange and didn't rise. Also, the wrappers fell off. Very strange.

So this year is a redo. And the are awesome.

Shirley Temple Cupcakes, take 2

1 box white cake mix (I used Duncan Hines)
          the mix calls for 3 eggs, 1/2 cup oil, and 1 1/3 cups water (I used Sprite)
To the Sprite I added ~1 T of cherry flavoring (I found it at Walmart next to the almond extract) and some red food coloring.
I also diced up ~1/2 cup of maraschino cherries, dusted them with flour (so they wouldn't sink) and mixed them into the batter for an extra cherry punch

Mix and bake (350 degrees, ~18-20 mins)

For the frosting:
1/2 cup butter, softened
~3-4 cups powdered sugar
a few drops of cherry flavoring
several T of sprite and grenadine

Mix together and frost the cupcakes!

Very sweet, very girly, very yummy

They were a hit with Molly too!

Me and the birthday girl!

Monday, October 10, 2011

Left Over Pumpkin??? Solutions!

So you followed my post on how to make a pumpkin pie from scratch, but you're now facing a dilemma. Extra pumpkin. 


This extraneous pumpkin would not be a problem if you had enough for a second pie, but its not. You only have a little left. What are you going to do with it? It seems wasteful to throw it away. And its not something you're just going to dig into with a spoon (at least I wouldn't), or give to the dog (although mine would love that option). You want to use it purposefully.


First, figure out how much pumpkin you have left... 1 cup, 1/2 cup, just a few tablespoons? Here are a few ideas:


Mini Pumpkin Doughnut Muffins (Healthy!)
Adapted from http://kirbiecravings.com


3/4 cup sugar
1 large egg
1 1/2 cups all purpose flour
2 tsp baking power
1/4 tsp salt
1/4 tsp ground nutmeg
1/4 tsp cinnamon
1/4 cup vegetable oil (I used sugar free apple sauce)
1/2 cup fat free milk
1 tsp vanilla extract
1/2 cup pumpkin puree
Coating:
1/4 cup (1/2 stick) butter, melted
2/3 cup sugar
2 tsp ground cinnamon (go nuts on the cinnamon if you love cinnamon like I do)

directions:


1. Preheat oven to 350F. Grease mini muffin pan with pam spray.
2. In a large bowl, whisk together sugar and egg until combined. Add in flour, baking powder, salt, cinnamon and nutmeg. Mix until combined.
3. Then mix in pumpkin puree, vegetable oil, milk and vanilla extract.
4. Spoon in batter to muffin pan about 2/3 full (it will look quite runny, don't worry).
5. Bake for 12-15 minutes until toothpick inserted comes out clean. Let muffins cool before coating with cinnamon sugar.
6. For the coating. Melt 1/4 cup butter in a small glass bowl. In another small bowl, combine 2/3 cup white sugar and 2 tsp cinnamon. Dip top of donuts in melted butter (or you could go wild and do the whole thing) and then dip in the sugar mixture.

Caution: These things are addictive. You can't eat just one!

So moist and yummy!

If you have only a tablespoon or two left, this recipe is perfect. This syrup is great in coffee, chai tea, and best of all, oatmeal!

Pumpkin Syrup:
Mix anywhere from 1 teaspoon to 1 tablespoon of this pumpkin spice syrup into a mug of your favorite hot drink, depending on how sweet and pumpkin-flavored you want it.
Yields: approximately 1 1/2 cups
Prep Time: 5 minutes
Cook Time: 10 minutes
2 tablespoons pumpkin puree
1/2 cup granulated sugar
1 cup water
1 teaspoon ground cinnamon
1/2 teaspoon ground nutmeg
1/4 teaspoon ground cloves
Combine all ingredients in a small saucepan. Over low heat, bring to a simmer, stirring occasionally to keep the sugar from burning.
Simmer until the sugar is completely dissolved and the pumpkin is fully mixed into the syrup. Allow to cool for 10 minutes before transferring to an airtight container. Refrigerate and use within 3 weeks.

Saturday, October 8, 2011

Red Velvet Whoopie Pies for Karin

Tomorrow is one of my best friend's, Karin, birthday. As is tradition (two years and counting) I asked her what she wanted for her birthday. Her request: Red Velvet Whoopie Pies! Yum...


So these whoopie pies are dedicated to Karin, a great friend and confidant. She's been there for me quite a lot the last few years, helping me with personal and school related crises. She's always around for a laugh or a quick therapy session, sometimes both (she always knows what to say to keep me sane!). So here's to Karin!


Whoopie Pies: The new cupcake


Red Velvet Whoopie Pies:
recipe adapted from: www.browneyedbaker.com


Yield: About 2 dozen assembled whoopie pies
Prep Time: 20 minutes | Bake Time: 40 to 50 minutes total
For the whoopies:
3 cups all-purpose flour
1/3 cup cocoa powder (sifted)
1 teaspoon baking powder
½ teaspoon baking soda
½ teaspoon salt
½ cup unsalted butter, at room temperature
½ cup vegetable shortening
½ cup light brown sugar
1 cup granulated sugar
2 eggs
2 teaspoons vanilla extract
3+ teaspoons red food coloring (depends on how red you wanted them, the batter will darken a bit when baked)
1 cup buttermilk (or buttermilk powder, which I highly recommend, because who needs a whole carton of buttermilk that they have to use up)
For the cream cheese filling:
8 ounces cream cheese, at room temperature
8 tablespoons unsalted butter, at room temperature
7 cups powdered sugar
2 teaspoon vanilla extract
1. Position a rack in the center of the oven and preheat the oven to 350 degrees F. Line two baking sheets with parchment paper; set aside.
2. Whisk together the flour, cocoa powder, baking powder, baking soda, and salt in a medium bowl; set aside.
3. In the bowl of a stand mixer with a paddle attachment, beat together the butter, shortening and both sugars on low speed until just combined. Increase the speed to medium and beat until fluffy and smooth, about 5 minutes. Add the eggs one at a time, beating well after each addition. Add the vanilla and the red food coloring and beat until just blended.
4. Add half of the flour mixture and half of the buttermilk to the batter and beat on low until just incorporated. Scrape down the sides of the bowl. Add the remaining flour mixture and remaining ½ cup buttermilk and beat until completely combined.
5. Using a spoon (or a medium cookie scoop, which is what I used), drop a ball of batter onto one of the prepared baking sheets and repeat, spacing them at least 2 inches apart (they really spread). Bake one sheet at a time for about 15 minutes each, or until the cakes spring back when pressed gently (check, don't just assume). Remove the baking sheet from the oven and let the cakes cool on the sheet for about 5 minutes before transferring them to a rack to cool completely.
6. While the cakes are cooling, prepare the filling… In the bowl of a stand mixer with the paddle attachment, beat together the cream cheese and butter on medium speed. Add the sugar and beat on low speed until combined. Add the vanilla and increase the speed to medium-high; beat until creamy and smooth, about 4 minutes.
7. To assemble: Spread the filling onto the flat side of one cake using a knife of spoon. Alternatively, you can use a pastry bag with a round tip (I used a large star tip) to pipe the filling onto the cake. Top it with another cake, flat-side down. Repeat with the rest of the cakes and filling.
Storing: Assembled whoopie pies can be stored in an airtight container for up to 3 days. If you need to stack layers, place a piece of wax paper/clingwrap between layers.
Finished Product: Sweet, creamy frosting, moist cake. Amazing.

Monday, October 3, 2011

Vanilla Bean Cardamom Bundt Cake with Chai Tea Syrup

My future sister-in-law, Andrea, just came back from a trip to Madagascar, and she sent me whole vanilla beans. When I got them, I was SOOOO excited. I've seen vanilla beans used on cooking shows and I have always wanted to use some myself, but they tend to be pretty pricey. When I received these, my first thought was "I have to find a recipe!" This is what I came up with: Vanilla Bean Cardamom Bundt Cake with Chai Tea Syrup from http://weekofmenus.blogspot.com


You gotta smell this cake


I've never cooked with cardamom and didn't even know what to expect, and wow, its some strange stuff. I bought a jar (the stuff is pretty expensive) and got to work. Here is the recipe:


Cardamom Vanilla Bean Bundt Cake with Chai Soaking Syrup
Makes 10-inch bundt cake, serving 12 to 14

Cake
Ingredients
3 cups all-purpose flour
4 teaspoons ground cardamom powder
½ teaspoon baking powder
½ teaspoon baking soda
½ teaspoon salt
1 cup (2 sticks) unsalted butter, softened
1 cup brown sugar
¾ cup granulated sugar
4 large eggs, room temperature
1 vanilla bean, split, seeds removed (empty vanilla bean used for the syrup)
1 cup sour cream

Syrup
Ingredients
⅓ cup water
⅔ cup granulated sugar
2 chai tea bags (whatever you like)
Leftover vanilla bean pods (for extra flavor)

Method
Place rack in center of oven, and preheat oven to 350. Grease and lightly flour inside of 10 inch bundt pan.

Whisk together flour, ground cardamom, baking powder, baking soda and salt in a large bowl. Set aside.


Using either a stand mixer (paddle attachment) or a hand mixer, beat the butter at medium speed until creamy, about 2 minutes. Gradually add sugars and beat at medium-high speed until the mixture is light in texture and color, about 3 minutes. Beat in eggs one at a time, beating for 30 to 40 seconds after each addition. Scrape down sides of bowl as necessary. Beat in vanilla bean. At low speed, add flour mixture in three additions, alternating with sour cream. (Add a bit of flour, a bit of sour cream, a bit of flour, a bit of sour cream, a bit of flour.)

Scoop batter into pan and spread with spatula. Smooth with spatula.


Bake cake for 50 to 60 minutes, or until a tooth pick inserted in the center comes out clean. Cool the cake in the pan on a cooling rack for 10 minutes, then invert it onto another rack. Place the cake, on the rack, over a baking sheet.


While cake is baking, make syrup. Combine water, sugar, teabags and empty vanilla pod in a small non reactive saucepan and cook over medium heat, stirring until the sugar dissolves, 3 to 4 minutes. Remove pan from heat. Using a pastry brush, dab syrup generously all over surface of the warm cake, allowing it to soak into the cake before reapplying. Let the cake cool completely.


Finished product... yummy


Saturday, October 1, 2011

Homemade Pumpkin Pie

Welcome to Fall! Today is October first and we woke up to a "cold front" this morning. By cold front I mean 76 degrees in the morning with a high of only 86 today. So, not a cold front to those up North, but cold enough for me!

I'm not a fan of Fall. Even as a kid, I didn't really like Fall. The only things I like about Fall are fresh apples, pumpkin pie, Halloween (as a kid), and football. I moved to Florida, in part, to get away from the cold and Fall. I like Florida Fall much better. Still warm enough to go to the beach, get a tan, walk the dog in shorts at 7 am, and never having to bundle up.

Yeah, we love football

As I said, I love pumpkin pie. I grew up having it on Thanksgiving morning for breakfast (yes, breakfast. Its a vegetable!). My dad was always in charge of making the pies for Thanksgiving, even though he didn't like pumpkin pie himself. He just made it for us girls. That's a good dad for ya.

Now that I'm an adult, I make my own pumpkin pie. If you don't count the crust, its one of the easiest pies to make. Pretty much you just throw everything into a bowl and mix it up. Chris also loves pumpkin and our 6 month anniversary is Oct 5, so I have made it for the two of us the last three years. So, in addition, happy 3.5 year anniversary Christopher!!!

I've never made pumpkin pie from scratch before. I'm not talking about making the crust (that's a given), I'm talking about starting from a whole pumpkin!

Turns out, roasting the pumpkin is super easy! Just procure a sugar or pie pumpkin (I got mine at Walmart), wash it, cut it in half (use a big knife), scoop out the seeds, and roast it for ~45 minutes in a 350 degree oven. If you can poke into it easily with a sharp knife, its ready. Let it cool, scoop out the flesh, and puree. I guess it freezes very well. If you want an in-depth look, I suggest watching the Good Eats episode on youtube.

Side note: I opened my pumpkin and was like "Oh yeah, pumpkin seeds." I rinsed them, dried, and toasted them in a non-stick skillet, dropped on 2 T of brown sugar, and then sprinkled with salt. Ta-Da! Kettle cooked pumpkin seeds! They were amazing!

Here is the roasted pumpkin. Very pretty color.

Pumpkin puree

First, before mixing up your pie, you have to make the crust. I've made pie crusts for years, but I have yet to have any luck with them here in Florida. I think its too warm (our apartment is about 79 degrees) and humid for a crust to stick together well. Oh well, the good thing about pie crust is that its hidden by filling.

Pie Crust (9 in):
1 cup AP flour
1/3 + 1 T shortening (NOT BUTTER)
2 to 3 T cold water (very cold)

Mix the flour with shortening with a pastry cutter or two forks until the shortening is in pea sized pieces. Drip in the water (1 to 2 T more water can be used if needed, but be careful). Mix until the dough comes off the bowl. Form into a ball, flatten into a disk, then wrap in cling wrap and chill in the fridge for about 45 minutes. 
To roll, I suggest using a silicone mat under it, sprinkled with flour, and roll out. Its also a good idea to flip the crust halfway to make sure its not sticking. When its the right size, either roll it over the rolling pin or cold up and move into the pie pan. Bake for 10 minutes, covered with foil at 425 degrees. Uncover and bake for another 2 or 3 minutes until starts to get golden.

For the pie filling:
2 eggs
1/2 cup sugar
1/4 teaspoon salt
1 teaspoon cinnamon
1/2 teaspoon ginger
1/8 teaspoon cloves
15 oz pumpkin puree
12 oz evaporated milk

In a large bowl, beat the eggs. Mix in the rest of the ingredients. Pour into prepared pie crust. Bake for 15 minutes at 425 degrees. Lower temp to 350 degrees, bake 45 minutes. Test the pie by wiggling. If the middle only jiggles a little, its done. If the edge of your crust is getting too dark, wrap with a strip of foil.

Cool for 2 hours or overnight. Enjoy!


Finished pie. Crust doesn't look great, but its all about the flavor

Dreamy.