Search This Blog

Wednesday, November 23, 2011

Brutus Bites: Pumpkin Dog Cookies

Brutus, my beloved yorkie, is a fan of my baking.


We didn't discover this on purpose, as we try to not give Brutus food scraps, especially from the table. We discovered his love for snickerdoodles after he stole one right out of Chris' hand, and we discovered his love of cream-cheese frosting after he went nuts from the smell when I made the whoopie pies (he didn't get any whoopie pie, only the frosting).


As I said, we don't generally give Brutus any people-food, so I thought I'd let him in on some of the holiday baking action by making a special batch of cookies just for him.

I found this recipe online at http://www.all-natural-dog-treat.com/dogtreatrecipe.html. Its easy, only has three ingredients, and is very healthy.


Pumpkin Dog Cookies

Ingredients:


  • One 15 oz. can mashed pure pumpkin (NOT the spiced pie filling)


  • 3/4 cup cream of wheat (or rice cereal if wheat-sensitive) You can mix this dry--no need to cook it first


  • 1/2 cup dry powdered milk 


  • Directions: Preheat oven to 300 F. 
    Mix all ingredients together. Drop small spoonfuls (I use about a tablespoon) onto a lightly greased cookie sheet and bake at 300 degrees for 15-20 minutes. After I dropped them on the cookie sheet I flattened them with a damp finger. Monogram is optional.

    If you'd like to make bite sized cookies for small dogs, training rewards or just small treats, you can use a pastry bag and squeeze out rosettes about the size of a dime for tasty bite sized cookies!

    Keep in mind, these cookies are dense and don't spread, so how they look before they go in the oven is how they look when they're done.

    Depending on the size, this recipe will make around 20 treats. 

    Humans can eat these as well, but they don't have much flavor (I tried them).

    The long one is because I didn't want to use a third cookie sheet for only 1 or 2 cookies

    Brutus loves these cookies and thinks you should make them for your favorite puppy!

    Friday, November 18, 2011

    Soy Sauce Brined Turkey


    Its time for Thanksgiving! Time for pigging out on tons of yummy, tradition-laden, foods.

    Funny thing is, until last year, I wasn't really a fan of the Thanksgiving turkey. For most people, the turkey is the highlight of the Thanksgiving meal. For me, well, give me a steak or ham any day. That's not to say that I grew up eating dry, bland, turkey. I didn't! Every year, my dad would pull out the old charcoal webber grill to grill/smoke the turkey. It would always turn out moist with great smokey-ness. While I liked the taste of it, after one or two bites, it was enough for me.

    When I had a chance to make a turkey for myself and Chris last year, knowing I didn't have a charcoal webber to use, I had to figure out how to make a turkey myself.

    Luckily, I happened to catch this on the food network:

    http://www.foodnetwork.com/videos/altons-turkey-brining-secrets/866.html

    Ah yes. Alton Brown explaining the importance of brining a turkey. Always good eats, always good science. I was determined to use a brine on my turkey. But then I stumbled upon this:

     http://gastronomyblog.com/2010/11/16/soy-sauce-brined-turkey/

    I'm not even going try to pretend I came up with this recipe or pretend that I made enough alterations to allow me to post it myself. Just go to the Gastronomy Blog, follow the directions, and ta-daa! A perfect, juicy, flavorful turkey.

    I have used this recipe three times, about to use it again this year. I love it.

    I hope you do too!

    Let me know what you think!


    Thanksgiving for two! Yummm!

    Monday, November 14, 2011

    General Tso's Chicken

    I don't about you, but I love Chinese food. I could eat it every day. Unfortunately, take-out Chinese food isn't very healthy, especially my favorite dish, General Tso's Chicken.


    After much searching and tasting, I have found a great recipe for homemade General Tso. It doesn't require deep frying and you can adjust it to your tastes. We like this so much, and I made it all the time!


    This recipe can be made with chicken breast, tenderloins, thighs, shrimp (very good), pork, or tofu (never tried pork or tofu, but I bet it would be good). Its good over rice or noodles. You can add as many veggies as you want, but I usually just stick with broccoli. I have made it with broccoli, carrots, cabbage, broccoli slaw, corn, onions, bamboo shoots, mushrooms, edamame, etc.


    General Tso's Chicken

    • 1/2 cup brown sugar
    • 3 tablespoons hoisin sauce
    • 3 tablespoons rice wine vinegar
    • 3 tablespoons ketchup
    • 2 tablespoons soy sauce
    • 1/2 cup water
    • 3-4 tablespoons cornstarch
    • 1 pound boneless, skinless chicken breasts, cut into 1-inch cubes
    • 1 tablespoon olive oil
    • 1 tablespoon sesame oil
    • 1 head steamed broccoli (or other veggies)
    • 3 tablespoons fresh ginger, finely chopped or grated
    • hot pepper flakes (optional)
    • sesame seeds (optional)
    • green onions, chopped, for garnish
    • hot rice, for serving
    Instructions
    • In a small bowl, mix together the brown sugar, hoisin sauce, rice wine vinegar, ketchup, soy sauce and water (if you like it spicy, add red pepper flakes and/or siracha). Set aside.
    • In a large skillet, heat the olive oil. Dredge the chicken in the cornstarch and shake off any excess. Cook the chicken in the olive oil until browned. Remove the chicken from the skillet and cover with foil to keep warm.
    • Using a paper towel, wipe the skillet clean. Add the sesame oil and ginger. Cook until fragrant, about 1 minute. Add the sauce mixture and bring to a boil. Simmer mixture for 2 minutes, or until the sauce thickens a bit. Add the chicken back into the skillet, toss to coat with sauce, and continue cooking until the chicken is cooked through.
    • Serve garnished with green onions, hot pepper flakes (if desired) and sesame seeds (if desired).


    The chicken gets a nice crisp crust that mimic deep frying without all the fat

    Sauce, simmering

    Yummm!

    Tuesday, November 8, 2011

    Saltwater Taffy

    I don't know why I was struck by the sudden urge to make taffy, but I was. And the feeling continued for several weeks.


    Taffy is funny stuff. I've never been a huge fan of taffy, but if its offered to me I'll always accept. I think I've bought it a few times, but its never a huge draw. I'm more of a chocolate girl.

    I think what made me want to make taffy is the process of pulling the taffy. Having to stretch and fold the taffy over and over was really appealing. Plus, I have enjoyed experimenting with various forms of sugar work (i.e. marshmallows, syrups, etc).

    To prep for this taffy-pulling-extravaganza, I found a friend crazy enough to possibly be burned my molten sugar. Ariel was the perfect candidate. Plus, she said we could make it in her kitchen (which is a plus because I've been known to make a mess or two). I also watched the Good Eats episode on taffy, you know, just in case.


    Disregard our haggard appearance. We had done hot yoga just hours beforehand.


    Saltwater Taffy
    yields roughly 1 1/2 pounds
    adapted from lorannoils.com
    2 cups sugar
    2 tablespoons cornstarch
    1 cup light corn syrup
    3/4 cup water
    2 tablespoons unsalted butter, melted
    1 teaspoon salt

    Various extracts or flavoring oils (we used peppermint and cherry+lemon)
    food coloring, optional


    Prepare a shallow heat safe pan by lightly buttering it. If you plan on dividing the candy into multiple batches, prep 2-3 small pans. Have your flavorings and colorings nearby with buttered spatulas ready to stir.

    Sift together the cornstarch and sugar and add to a medium thick-bottomed sauce pan (if your pan doesn't have a thick bottom, place another pan underneath. The two layers will help diffuse the heat, making it more uniform. Also, if it overflows, it won't be onto your stove burners... always a plus). Stir in the corn syrup, salt, butter and water. Place over medium heat and stir until the sugar dissolves. Once it comes to a boil, cover and cook for three minutes (turn down the temp a little so it doesn't overflow). Remove the lid and then clip on your candy thermometer and cook to 260°F.

    Once the syrup hits 260°F, remove from heat and add your flavors/colors and mix well (don't inhale if you're using extracts. Unless you have a cold and are working with peppermint extract... that shit will clean out your sinuses so fast!). Then pour into your prepared pan. If you're doing multiple batches, divide the syrup between the pans and add the flavorings (we used 1-2 Tbsp of extract in each pan, but use less if you are using flavoring oils as they're stronger) and colors and then mix well.

    After the flavors were mixed, cooling
    Allow the candy to cool until until solid enough to handle and then butter your hands lightly and begin pulling!

    You want to stretch out the taffy, bring the ends together to form a loop, stretch and repeat. Over and over. Do this for about 15-20 minutes until the taffy has a creamy, satiny appearance. All this work will incorporate air into the candy, making it soft and chewy. The more pulling the better it will be.

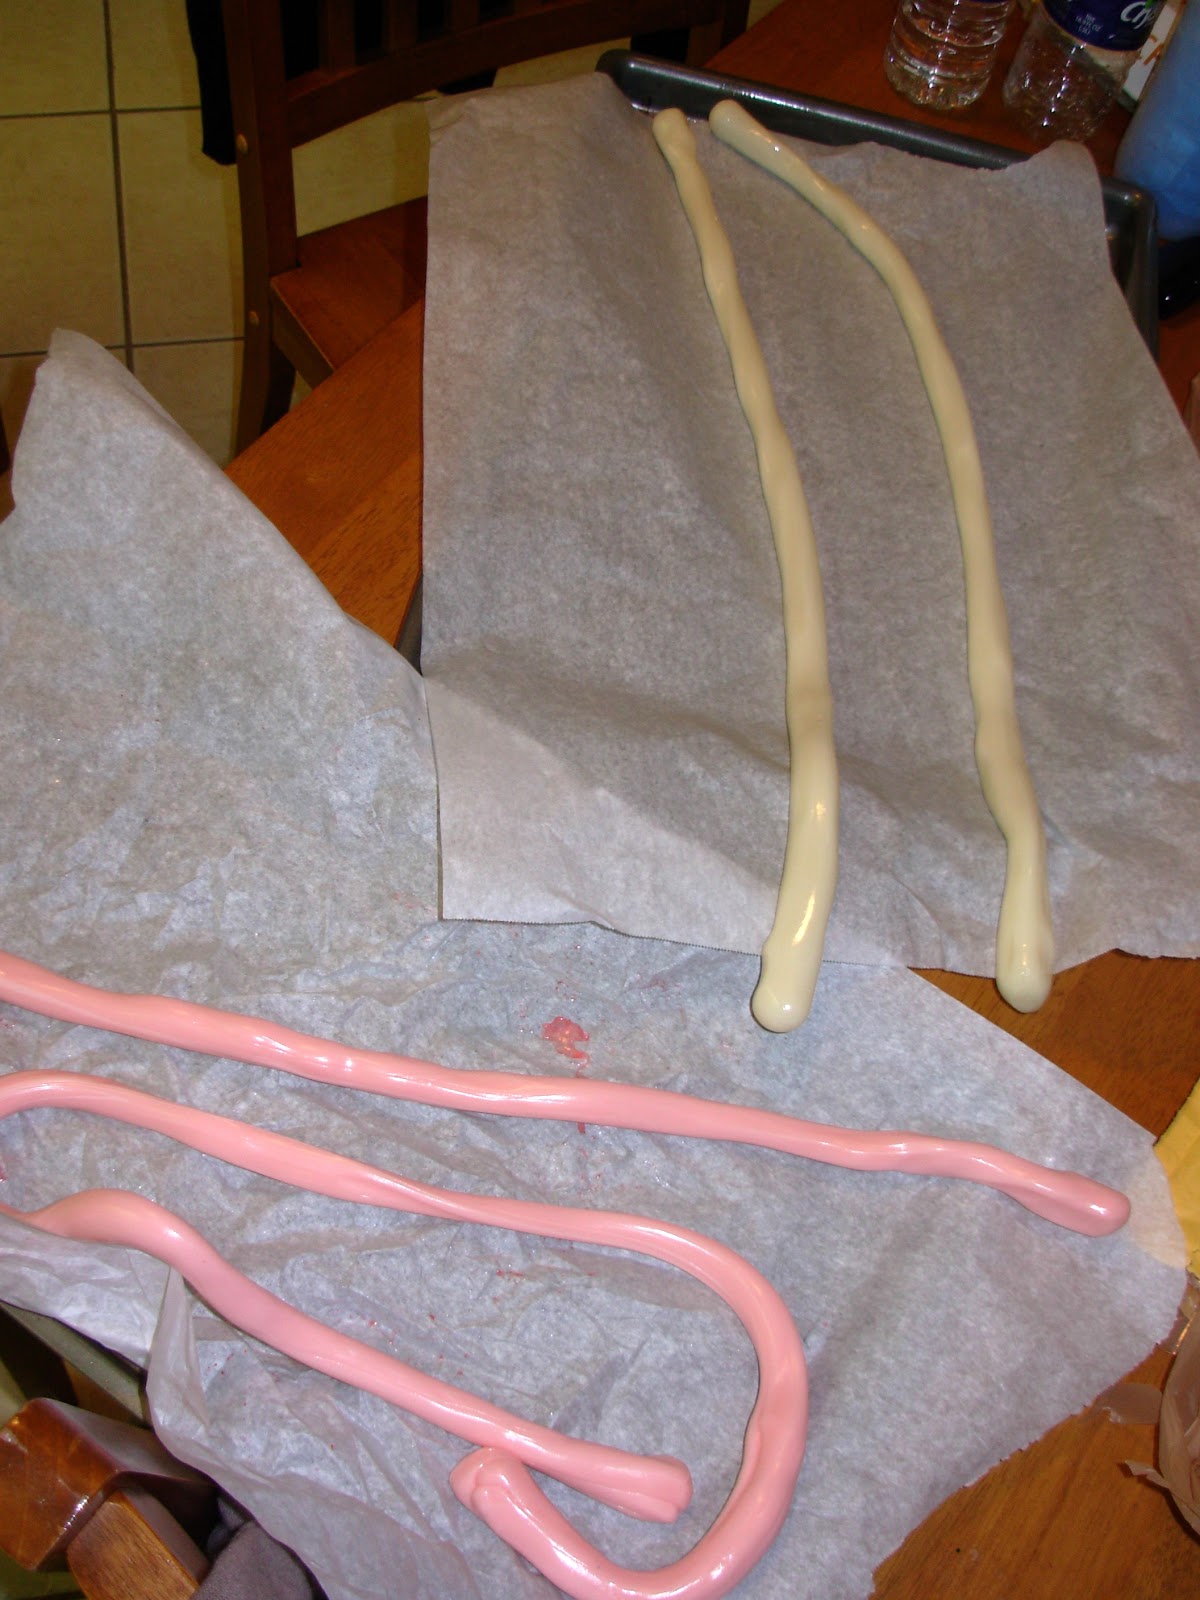
    After pulling, roll the taffy into long ropes, and quickly snip with oiled scissors. Keep the pieces separate so they don't stick together. Roll them in squares of waxed paper to store.

    Here is the taffy, just before pulling

    In the beginning of the pulling process

    After pulling, rolled out to cut

    All cut up, really to wrap
    Ta-Daa! We ended up with "shirley temple" and peppermint flavored taffy

    In the end, this taffy tasted great and was pretty easy to make. We didn't pull it long enough, so its pretty hard, but its great for sucking on before it softens up.

    Wednesday, November 2, 2011

    Chocolate Chip Pecan Pie

    This recipe is a family favorite. We always had it as a Thanksgiving treat, and just like the pumpkin pie, my dad was in charge of making it. 


    This pie is classic, sweet, and, oh yeah, chocolately.

    Yes. I said chocolately. Our family always takes these types of things to the next level. Its like blinging out a pie. With chocolate chips.

    Without further ado:

    Pecan Pie
    1 9in pie crust
    4 tbsp butter, softened
    3/4 cup light brown sugar, firmly packed
    3 large eggs
    1 tbsp cornstarch
    1/8 tsp salt
    2 tsp vanilla extract
    3/4 cup dark cane or corn syrup
    1 cup broken pecan pieces
    1/2 cup chocolate chips


    Cream the butter and sugar together until smooth. In a separate bowl, beat the eggs and then blend them into the butter mixture. Sift the cornstarch and salt into the mixture, and then add the vanilla extract. Blend in the cane syrup, followed by the pecans (and 1/2 cup of chocolate chips). Stir until thoroughly mixed. Pour into the pie crust, and float a few whole pecan halves to make a pretty design. Bake for 30 minutes at 325 degrees, then reduce temp to 300 degrees for another 30 minutes, or until center looks firm. Serve warm with vanilla ice cream.

    Ta-Daa!

    The recipe is good for impressing in-laws, guys, southern ladies (Paula Dean), and co-workers.