Search This Blog

Thursday, July 23, 2015

Bibimbap - My First Cooking video!

Long time, No see!

Hello everyone! I am back! 

Sorry for such a long hiatus. I've been so incredibly busy. In biggest news, I completed my PhD! Yep, that's right. This psych-in-the-kitchen girl is a genuine Doctor of Psychology!

But, you are here for the food, right? Right.

In my limited spare time I've been watching episodes of "Korean Made Simple" on the Cooking channel. It talks about traditional Korean dishes and ingredients and shows you how to make Korean food at home.

I decided to try my hand at a Bibimbap dish with beef and vegetables. Bibimbap is a bowl of sticky rice with vegetables, usually a meat, and a runny egg. The ingredients are placed side by side on top of the rice like a pinwheel. They can be enjoyed separately or mixed together like a stir-fry. Its fun because you can add almost anything!

Traditionally, this dish uses an odd number of ingredients. I ended up with 9 in my bowl. You want some raw ingredients, some cooked, some hot, some cold.

Here is a video on how I made my Bibimbap bowl! 


In my bowl:
Sticky Rice (toasted with sesame oil)
Beef
Egg
Bok Choy, sauteed
Kimche (fermented cabbage)
Broccolini, sauteed
Carrot, julienned
Onion, sliced thin
Sesame Quick Cucumber Pickles
Bean Sprouts


Monday, December 16, 2013

Top 10 Kitchen Gadgets/Tools


Are you looking for some last minute Christmas gifts? Maybe you are registering for your wedding and would like to build up a quality set of kitchen tools (who needs crystal candle stick holders?). Well, fire up your Amazon Prime account, and get shopping!
Time to upgrade

Top 10 Kitchen Tools
(no, I was not paid to endorse any of these items, but if you work for one of these companies, get in touch with me!)

1.       12-in non-stick skillet with cover
2.       kitchen aid mixer
3.       dutch oven
4.       stackable cooling racks
5.       julienne peeler
6.       kitchen scale
7.       Thermapen
8.       lilly pad cover
9.       microplane
10.   magnetic measuring spoons

1.       12 inch non-stick skillet: This is my go-to to make dinner. I like the 12-inch size because it's large enough to hold a pound of pasta + sauce + meat +veggies or a stir-fry. I also like my skillet to have rounded sides so I can toss items while I sautĂ©. I also like the skillet to have a cover that helps with cooking things through or steaming veggies. You can pay anywhere from $10 to $100+ on one of these skillets, so go with what you like. I had a great one for about 5 years but it eventually wore out and the non-stick coating started to flake off (yum!). I replaced it with a $95 skillet that I like but it's not holding up as well as I thought it would.
2.       Kitchen Aid Mixer: What can I say? I'm a baker and I love my mixer. I got it as a gift from my mother-in-law and I use it all the time. It’s a pricy piece of equipment but it's so useful and it makes baking so easy. I love that it comes in a bunch of colors, comes with a paddle, whisk, and dough hook, and you can buy a bunch of other attachments to make it do all kinds of things (make pasta, grind meat, juicer, ice cream maker, etc). I have also purchased a scraping paddle attachment which is great because I don't have to scrape down the sides of the bowl as much.
3.       Lodge Dutch Oven 6 quart: Everyone who likes to make soups, stews, or roasts should have a large cast iron Dutch oven. I use mine at least once a month to make a soup. They hold their heat really well, don't burn the food (great for caramelizing onions for French onion soup), and hold up to a lot of abuse. Yes, they are heavy. Yes, le creuset is the top brand but the price difference between lodge and them is huge ($275 for Le Creuset vs $80 for the Lodge). It’s a great staple and will last forever.
Not my kitchen. Yet. (Mine is about 1/20 of this size)
4.       Stackable Cooling Racks: If you have limited space in your kitchen and you like to bake a lot of cookies, you need a set of stackable cooling racks. They fold up nearly flat for storage but can hold 3 pans worth of cookies in the space of one rack. Plus, they're cheap. Sold.
5.       Julienne Peeler: If you would like to add some extra veggies to your diet, check out this item. It makes perfect small julienne cuts (matchstick) of vegetables like carrots, zucchini, squash, etc that can be added to pasta dishes or stir-fries. I also use it to get small pieces of carrot to add to my sushi rolls. My hubby, who says he doesn't like zucchini will eat it if it's julienned into a pasta dish. I like this one because it works just like a veggie peeler, is dishwasher safe, and seems to hold up well after many uses (even on hard vegetables like carrots).
6.        Kitchen Scale: I love my kitchen scale. I like this one because it was small, cheap, and had a bunch of nice features (tare or zero, several weight scales, etc). I use it to get precise measurements of flours and sugars, because serious bakers know that flour can vary in weight depending on how compact it is. To truly know what you are adding, you need to measure your dry goods by weight. This comes in very handy if you start using recipes written in metric. It's also nice to get a handle on serving sizes when on a diet (cereal serving sizes are deceptively small!).
7.       Thermapen: Have you ever over cooked a steak or chicken? Over cooked a cake? Well, with a good, accurate thermometer, this is no longer an issue. And Thermapens are top of the line. Yes, they are expensive, but they are super fast (3 seconds or less), extremely accurate, and can hold up to abuse. I just got one for Christmas, and I'm so excited to use it!
8.       Lilly-Pad Cover: This was an unexpected find for me. I don't often make impulse purchases, and I usually do a bit of research before buying anything, but this did it for me. The lilly-pad cover works great for sealing up bowl or plates without annoying cling-wrap. Its microwave and dishwasher safe, there is no adhesive, but its strong enough to lift a large glass bowl. I have the medium size and it just fits a 4 quart glass mixing bowl.
9.       Microplane: You have one of these, right? Right? No?!?! Ugh. Get one. Now. I use this microplane all the time. It grates fresh parmesan cheese, ginger, fresh nutmeg, garlic, zests citrus, etc. I use it at least 2x a week. It cleans up nicely in the dishwasher and has a nice plastic cover to keep the blade (and your hands) safe. And it's less than $13. Buy one.
10.   Magnetic Measuring Spoons: I hate it when I lose a measuring spoon. Or when I have to use one spoon on the ring and they all get dirty when I put them down. Well, no more. This set clicks together magnetically, stores easily, and has round and oval sides for easy scooping into small containers. Again, they're inexpensive but will be used for years. Also dishwasher safe!


I hope you liked this list. Are there any gadgets you use regularly that you would recommend?

Monday, November 11, 2013

An Egg-cellent Experiment

I like to think that I'm a pretty good cook. I cook or bake almost every day of the week, making simple dinner recipes as well as complex baked goods. I've had few problems making recipes that quickly bring most experienced cooks great pain… soufflĂ©s, French macaroons, roasts, turkeys, whole fish, etc. While I've had a few flops (for example: doubling the amount of butter in a cookie recipe), there are few recipes that trip me up more than once.

Except for hard-boiled eggs.

Dear lord, what happened to those eggs? 
I grew up eating hard-boiled eggs quite a bit. I love egg salad sandwiches, deviled eggs, potato salad (with egg), and eating hard-boiled eggs straight up with salt or soy sauce (try it, it's amazing!). Now, sometimes when my parents made hard-boiled eggs, the egg's shell would slide right off the egg in one piece. Other times, the shell would stick to the egg's white and would only come off with chunks of the white, destroying the look of the egg (not to mention wasting it). We would chalk up the differences in peeling ability to the eggs' freshness or lack thereof.

As for myself, I've had terrible luck making hard-boiled eggs down here in Florida. I make sure that I buy eggs a few weeks in advance before attempting to hard-boil them and I use my mother's method for cooking them:
Put eggs in pan with cold water (covering them by an inch or so of water)
Bring to a boil
Turn off burner, cover, and let sit for 12 minutes
Shock in an ice bath until cool
Peel and eat

Theoretically, the eggs should turn out perfectly cooked, with bright yolks (no green circle) and tender (not rubbery) whites.

This method, however, never seems to work for me. While my yolks are bright and my whites are tender, the peel sticks. Badly. My eggs come out looking like they've been peeled by someone with sporks for fingers. For pretty deviled eggs in my house, I've resorted to buying the eggs pre-cooked and peeled (such a waste of money).

So I did what anyone my age would do… I turned to Facebook. I implored my friends to help me out by telling me how they cook their eggs so that the shells come off. As it turns out, there are a lot of ways to cook eggs that "come out perfectly."

After many comments and suggestions, I boiled down (har har) the techniques into 6 variations of cooking time and peeling temps.
1.       Boil the water, add the eggs, boil for 7-10 minutes, then peel hot
      2.       My normal method: Add eggs to cold water, bring to a boil, sit covered for 12 minutes, shock in ice bath, peel cold
3.       Add eggs to cold water, boil for 5 minutes, shock in ice bath, peel cold
4.       Pampered Chef Method: Add eggs to cold water, bring to boil, simmer for 12 minutes, add ice & cold water, peel cold
5.       My normal method but peeled hot
6.       Bring eggs to room temp (about 1 hr), then boil in my normal method.
So, doing what any good scientist would do, I set out to perform an experiment (I am a researcher after all).

I bought 18 eggs, waited about 2 weeks, separated the eggs into groups of 3 (for 6 groups total… see, Math!) and cook the eggs in all six methods. I even used a Sharpie to label the eggs and took pictures of the results (see below).

After cooking, I peeled the eggs to test for difficulty of peel, and cut one open to see how they were cooked inside.


Results: None of the methods worked well.

Please, follow along as I discuss my results:
First, these are the eggs I purchased. These are plain white large eggs, purchased at my local Publix. I got 18 because I wanted plenty of eggs to work with and I wanted them to be from the same carton to keep everything as controlled as possible.
Here is the sell-by date. I purchased the eggs about 2 weeks prior to my attempt (11.10.13).
To demonstrate my method, here is a photo of three eggs in one of the pots I used to conduct this experiment. Note the number of the bottom of each egg. This allowed me to keep track of which eggs were in which group/cooking method.
Here is one of the eggs from group 1, unpeeled. Note the cracked shell from the heavy boiling for 8 minutes (sorry its blurry... cell phone camera wouldn't focus) 
Here are the peeled eggs from group 1. Pretty bad on two of them, third isn't terrible, but not unscathed.
Results from group 2, not pretty
Results from group three... pretty bad
Inside of individual from group 1. Not completely cooked. 
Inside of one egg from group 3 (only 5 minute boil). Very under cooked 
Don't worry, they didn't go to waste. They given a proper send off with flur de sel and white truffle oil
Results from Group 2 (my normal method). Center is fully cooked (just a tiny spot in the middle) with bright yellow yolk and tender white
Here are the results from group 4 (Pampered Chef Method). Cooked inside, but peel was pretty tough to get off. Better, but not good.
Group 5: My normal method, but peeled hot. Not only was this potentially very painful, the results were poor
Again, group 5, not completely cooked inside. I think it needed to rest in the cold water to finish cooking a bit inside
Group 6 - The room temp eggs, cooked normally. Fully cooked inside, peels came off with a bit of a struggle, but better than the rest.

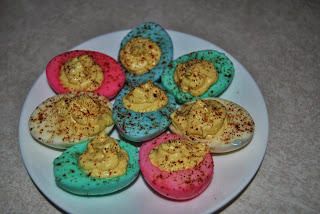
What did I do with all those eggs? Deviled them, of course. Made with Sraracha mayo. Yum!
The rest will go in my lunch this week.
 Now, these are of course, not the only ways to hard boil eggs. Oh no. These methods include, but are not limited to, baking in the oven (the Alton Brown Method), adding vinegar to the cooking water, adding baking soda, adding salt, and using filtered water (although that could get pricey). Further research must be performed before a final analysis can be made.

Any hints, tips, suggestions, or voodoo curses I could use? Please, help me out... I want pretty eggs!

Monday, September 16, 2013

Mongolian Beef

Hey you guys? Do you realize its September? When did that happen?

Wow. This summer went by so quickly. I hope you all had a great time with plenty of relaxation and time outdoors. I'm a huge fan of summer (I live in Florida, land of eternal Summer) but this year I didn't get as much time to relax as I usually do. As you know, I'm a Ph.D. student in a psychology program, so "rest" and "relaxation" don't really work well in graduate programs. Rest and relaxation are often combined with guilt and feelings of inadequacy. "Oh, you want to go to the beach this weekend? Make sure you print out two or three articles to read. No pleasure reading for you!"

Thankfully, my husband and I were able to schedule a beach vacation in Naples/Ft. Myers/Sanibel Island just after I turned in papers that completed my comprehensive exam process. This timing allowed me the perfect opportunity to go away on vacation with almost no guilt (6 months of torture was enough) and I really had a chance to disconnect from work (NO EMAIL FOR 9 DAYS!).

The great thing about living in Florida, other than no snow, is that beautiful vacation spots are always nearby. We wanted to spend a week on the beach, and we looked into international travel, but the flights were all too expensive. We chose to spend a few days in Naples, Ft. Myers, Sanibel Island, Florida (Naples is only 1.5 hours from where we live). We quickly fell in love with Naples and enjoyed our entire vacation. We ate great food, lounged on beautiful beach, swam in clear warm water, and collected tons of shells. I would recommend a trip to Naples to anyone looking for a relaxed beach vacation without of the crazy touristy feel of most beach town. Beach access is everywhere, parking isn't expensive, and we found a nice inexpensive hotel just a few minutes from the ocean. Here are just a few photos of what we did/saw.


But alas, it's back to the grind. The semester just began and I'm back to making dinner every night. I recently discovered an amazing recipe for Mongolian Beef (I hear it tastes just like PF Chang's, but I've never eaten there… I prefer local Chinese food places) that is a quick hearty weeknight meal.


Mongolian Beef (30 minutes or less!)

1 large steak (about 1-2lbs…I use London broil, I can find it on sale for $3.99/lb, but flank steak would work as well)
½ C cornstarch
1 C oil
2 tbsp ginger (grated/diced)
2 tbsp garlic
1 C soy sauce
1 C packed brown sugar (you can go a little light on this if you want)
Assorted veg: steamed broccoli, cabbage, bok choy, chopped green onions, mushrooms, edamame, carrots, etc
Cooked rice/quinoa (I like 2/3 basmati rice and 1/3 cup quinoa), or noodles
                                                                                                                                                
Directions
Beef cooking up
Slice up the beef really thin, about a ¼ inch (it helps if it’s a little frozen, about 30 minutes in the freezer) and toss it with the cornstarch. Let the cornstarch sit on the beef for a few minutes while you prep the sauce. Mix the ginger, garlic, soy sauce, and brown sugar together in a bowl. Heat up the oil in a skillet or wok. Once good and hot, add the beef and cook until just cooked through (meanwhile prep and steam your veggies). Once the beef is cooked, remove it from the pan and let it drain onto a plate lined with a paper towel. Add the sauce to the hot skillet and cook until it bubbles and thickens. Add the beef and veggies back into the skillet and toss to coat. Serve hot over rice/quinoa. Dig in!
Fun story: I found an oyster mushroom on a free at my apartment complex, and I added it to my stir-fry (disclaimer, I do not support you randomly finding and eating wild mushrooms unless you really know what you're doing).

Finished Product: Yum!

Do you have any great Chinese food take-out recipes? I love me some good healthy take-out swaps!

Thursday, July 25, 2013

Tips for Easier Grocery Shopping and Dinner Preparations

Tips for easier grocery shopping and dinner preparations

I'm the kind of person that does not like to go to the grocery store more than once a week. It's not that I don't like my grocery store, I actually really like it, but I find grocery shopping to be something that takes away from my puppy-cuddling-in-front-of-the-tv-time. Therefore, to maximize my shopping trips (not to mention my budget) I am a planner.

This is how I feel if I go to the store without a list. Total brain wipe.
To give you an idea of how I plan for my grocery trips and my meals, here's some tips and tricks I use:
Use the weekly ads. I get several ads a week, but the ones I concentrate my attention on are Publix and Penn-Dutch. For those of you outside of South Florida, Publix is a general grocery store. Their prices are sometimes a little higher than other stores in my area (such as Winn-Dixie or Walmart) but I like their selection (so I don't have to go to a second store to complete my list), quality, service  (I can always find someone to help me locate items on my shopping list and they never balk at my load of coupon), and location. I have a Publix less than half a mile from our apartment, which is critical when bringing home ice cream in August. Penn-Dutch is a local grocery store with two locations in my area (I try my best to buy from smaller companies when possible… not Walmart). They have amazing prices on produce, meat, and seafood (wild caught salmon for $4.99/lb, sushi grade tuna for $5.99/lb!) a good wine selection, some more unusual items (goat meat anyone?), but they don't have all my normal pantry items.

When I get the weekly ads, I make a list for each store (Publix, Penn-Dutch, Costco) based on the items on sale, keeping in mind ideas for meals and what I already have in my pantry. I love buy-one-get-one (BOGO) deals for things like pasta, pasta sauce, frozen items, etc. When I write out my list, I make a note of the price (for meat and produce), if it’s a BOGO, 10/$10, and brand or item information. That way, when I go to the store I know that its Ronzoni pasta on sale for BOGO not Bertolli brand or that it is the Fiji apples on sale not the Macintosh.

Coupons in weekend paper. I get the weekend paper just for the coupons and ads. Every few weeks, I sit down and cut out all the coupons for the items I want. I cut out the coupons for things I know I buy regularly (makeup, shampoo, pastas, etc) and some items that I may be interested in buying if I see them on sale (frozen meal: if they're BOGO plus I have a two $1.50 off coupons, I can get two mea

ls for almost nothing). Keep in mind that companies put out a lot of coupons for new items, like new lines of soup or granola bars, and many times these items will be on sale at the same time. If you aren't sure if you'd like these new items, cut the coupon and decide when you get to the store if it's worth the money. Sometimes they are. However, don't just buy stuff because you have a coupon. Buy it if it is something you will actually use and enjoy.

To maximize your coupons, its handy to buy a coupon organizer with dividers (see here). I have mine labeled by item type (Frozen, Meat/Produce, Pantry, Snacks, Dairy, Cleaning, Toiletries) to help me find the coupons I'm looking for while standing in the grocery aisle. I also sort through my coupons when I add more to throw away expired ones.   

Example of a coupon organizer... no need for anything complicated!
Plan a list of meals for the week. I like to plan a week's worth of meals before I go shopping. I base my plan on the items I have to use up in my freezer and what's on sale, typically writing out what I want to make for each night, which lets me not have to struggle to come up with something for dinner when I get home at 6. I also try to keep in mind what I want to eat for lunches as well as various snacks. I then add any last items onto my list based on my meal plans, making sure I have all the ingredients.

Keep an ongoing shopping list throughout the week. Did you use up the last egg? Almost out of baking powder? Put it on the list. This is also helpful for other family members to add items they want throughout the week (honestly, when you're making your list just before going shopping, you never remember the items you had been thinking about all week).

Re-write the list based on the layout of the store. This may sound like overkill, but a few minutes of re-writing my list saves me a lot of headache once I am in the store. I'm sure we've all missed items on our list only to have to run back across the store to get it. I avoid that by rewriting my list based on the aisles of the store, and this becomes easier as you get to know the store. At first, I was grouping items by type, but now I know that there is a aisle of paper goods between the international/candy aisle and the baking aisle and I can plan my list accordingly.

Stock up. This is not only for hurricane preparedness (I'm looking at you South Florida), this is good economic sense. There is nothing I hate more than buying a jar of pasta sauce full price because I ran out and I have a hankering for some spaghetti. When things you use regularly go on sale, but a lot of it. For me this includes ketchup, mayo, bbq sauce, pasta, sauce, canned tomatoes, and dark chocolate squares (I get two every day in my lunch bag. It is like an antidepressant for me). Also, if something catches your eye at the store and it's not on your list, buy it, just don't go crazy. I like being able to improvise my meals based on something I see in the store (yummy ripe peaches, a new marinade, etc).

Think outside the grocery store. Over a year ago, I joined an organic buying club (website is: http://www.anniesbuyingclub.com/) which allows me to get fresh organic produce for a great price. I get their ¾ box for $38 and that lasts me almost the whole two weeks between pick-up dates. Not only do I get fresh organic produce, but they try to have as much of it as possible locally sourced, it makes me try new varieties of produce, and it saves me a lot on my grocery bill.

Store food in a way that makes it easy to use. If you buy a 3 lb pack of ground beef, don't just throw the whole thing in the freezer (unless you plan to make a huge pot of chili) because you'll never use it. Portion out the beef (or chicken, or pork) into freezer bags in an amount you'd used in one dinner. After putting it into the bag, flatten it out as best you can, mark it with the contents and date purchased, then freeze it. That way, when you get home from work and realize you didn't take any meat out of the freezer to thaw, you can take it out of the freezer, put it into a sink with water, and it will be thawed in under 30 minutes, not three days. This also works great with shrimp (buy them with the shells on, way cheaper, and then freeze them flat in a bag). I once bought a 50 lb case of boneless skinless chicken breasts ($.69/lb, normally $3.99/lb) and broke them up into bags with 2-3 pieces per bag. We ate off that haul for months. Don't forget to ditch anything in the Styrofoam plates because even small items will take forever to thaw with the thermal protection of the "foam." This all takes time up front, but will make cooking dinner on a busy weeknight much easier. You can also do the same thing with produce by washing and chopping everything when you buy it for easy use in lunches and dinners throughout the week.

******************

Now, I use the above rules as much as I can. I plan meals and shop accordingly. But sometimes I don't. I get busy and when I get home I realize that I have no idea what I want to make for dinner, let alone have any defrosted meat. Therefore, below I've made a list of items I try to always have on hand to throw together healthy meals in under an hour.

Kitchen Staples to help you make dinner without a plan

·         Pasta (Spaghetti, fettuccini, macaroni, penne, farfalle, lasagna, orzo, etc)
·         Rice
·         Quinoa, couscous
·         Pasta sauces – marinara, vodka sauce, alfredo, pesto, clam
·         Frozen Veggies: peas, corn, broccoli, spinach, edamame
·         Fresh Veggies: broccoli, potatoes, tomatoes, lettuce, onion, garlic, carrots
·         Canned Veggies: Beans, Corn, Tomatoes, sundried tomatoes, water chestnuts/bean sprouts, bamboo shoots
·         Meat: Bacon, bags of frozen chicken tenderloins/cutlets (tenderloins are great because they can go straight from the freezer into the pan), Italian sausage, kielbasa, ground beef, pork, lunch meat
·         Asain: Hoisen, soy sauce, miren
·         Dairy: Cheese (shredded and block; Mexican and Italian blend, parmesan), butter, half & half, eggs
·         Baking: Flour, sugar, baking soda, baking powder, cocoa, brown sugar, powered sugar, chocolate chips, butter, vanilla extract
·         Herbs/Spices: Kosher salt, pepper, basil, oregano, cumin, chili power, garlic powder, onion flakes, thyme, sage, parsley, cilantro, mustard, ginger
·         Other: Honey, mustard, ketchup, bbq sauce, cornstarch, bread crumbs, mayo, panko, vinegar (red, cider, white), nuts, better than bouillon, hot sauce, jams/marmalades, salsa, tortillas

From this list, I can make 90% of my favorite meals. Here's a quick list: Stir-fry (both rice and noodle based, any meat you have), tacos (add corn and beans to the meat to stretch the meat), quesadillas (add veggies and refried beans for more nutrition), grilled chicken with tomato/peach marmalade sauce, cheesy noodle bake, casseroles, spaghetti and marinara sauce with ground beef,  vodka cream pasta with sausage, fried rice (with egg and kielbasa), bang-bang shrimp, rice pilaf (rice and orzo toasted, then water with bouillon added with frozen veg) etc.


I hope this list helps you out, even just a little. And PLEASE share your ideas for getting dinner on the table quickly with as low of a cost as possible!

Thursday, May 30, 2013

Guest Blogger: Ariel's Healthier Banana Bread

Hello everyone! I just wanted to introduce my amazing friend Ariel. Ariel and I have a great time baking together when we get time to hang out and we love sharing recipes. We've made a few things that have made it to this blog including Vanilla Bean Greek Yogurt Souffles and Saltwater Taffy. She has lovingly allowed me to post a recipe with some photos of a healthy version of banana bread that she made last week.

So please, lets give Ariel a warm welcome! *applause*

************

I eat a lot of bananas. Definitely at least one a day, more likely two. Due to this high consumption, I am often faced with the dilemma of what to do when they reach that too-ripe stage. I feel guilty throwing them away, but I also don’t love the texture of eating soft bananas. I used to just make a quick banana bread, but then I would watch that waste away because I didn’t want to eat it with all the sugar and butter used. In order to combat the guilty experience of throwing away too-ripe bananas, either in whole fruit or bread form, I started to search for a recipe that doesn’t use butter or tons of sugar. Here’s what I discovered:


Low-Fat Oatmeal Blueberry Banana Bread

I was super psyched about this recipe because not only does it omit butter, it uses Greek yogurt and only egg whites!! Plus, it adds oatmeal for a fiber boost. This bread is going to make a great breakfast.

1 cup all-purpose flour
1 cup uncooked old-fashioned oats
1/2 tsp baking soda
1/4 tsp baking powder
1/2 tsp cinnamon
1/4 tsp salt
3 bananas, very ripe
1/2 cup dark brown sugar
1 tsp vanilla extract
2 large egg whites
1 tablespoon plain greek yogurt
3/4 cup blueberries

Directions: (copied directly from the website)
1. Preheat oven to 350 degrees F. Grease a loaf pan and set aside. In medium bowl, stir together flour, oats, baking soda, baking powder, and cinnamon.
2. In separate medium bowl, mash bananas with fork. Add brown sugar and vanilla, mixing until smooth. Beat in egg whites and yogurt.
3. Combine wet and dry ingredients together for a somewhat smooth consistency. Gently fold in blueberries.
4. Pour into greased loaf pan and bake for 40-50 minutes, or until toothpick comes out clean.

This was so easy to make and came out so moist and delicious. The only modifications I made was using slightly more cinnamon and less blueberries because I only had about half a cup on deck.

Fresh from the oven!

***************

Thank you so much Ariel! 


Wednesday, April 24, 2013

Seattle – Foodie Heaven, Part II (Saturday & Sunday)


Thanks for coming back to hear about the rest of the good food I got to try in Seattle!

Turkey & Swiss Croissant and Pecan Roll

On Saturday morning, my roommate and I went back to the Specialty Bakery for breakfast. I got a chai tea latte, a turkey and swiss croissant and a pecan cinnamon roll. Both were still warm from baking!  The turkey croissant was so buttery and flaky, and stuffed with turkey! The pecan roll was sweet and delicate, and they made a perfectly filling breakfast.
Seattle Coffee Works Coffee Shop

A little later in the morning, I had a break in my schedule so I joined another one of my roommates and together we ran down to the Pike Place Market. OMG! This market is heaven for foodies like me. My friend knew of a great place to get some baked goods so while she waiting in line to order, I checked out the produce stands and the fish mongers. The produce stands were overflowing with fresh apples, berries, artichokes, oranges, broccoli, etc. It was like the supermarket produce section on steroids. Everything was bright, beautiful, fresh, and local! The produce guys who work there are great too… they're all eager to talk, give out samples, answer questions, and bag anything up for you. The fishmongers were very similar. They all greeted me, answered my questions, gave me some great information about their fish, and didn't mind that I wasn't there to purchase.


Check out those oysters! And so cheap!
Look at that produce!
Mushrooms!
Baked Goods, Fresh and Cheap!
Lucky for me, my friend had been on a walking tour of the market earlier that week, so she got to show me around. Once inside the main market area, she showed me the fishmongers who throw the fish back and forth, the flower stands, the dried fruit stands, cheese shops, and the jam/jelly people. All of the workers in the market were so friendly (nothing like people in Florida) and didn't mind that we were just admiring their goods. They were also very liberal in their samples, many times offering many different things to try without any pressure to buy. It was great. I pretty much ate a second breakfast just from all the samples I was given!

Flower stands... the picture is blurry because I was so excited I was shaking!

All the bouquets were $15 or less!
That afternoon, for lunch, I ran right back to the Pike Market. While there I ate a slice of pizza from DeLaurenti's Italian Market, then stopped and bought some candied coconut almonds and caramel cashews from a nut vendor. Walking around the market a little more, I was given samples of some more jams and fruit.

Monk Fish
A machine that drops in doughnut dough, fries it, flips it, takes it out, and dumps it into sugar


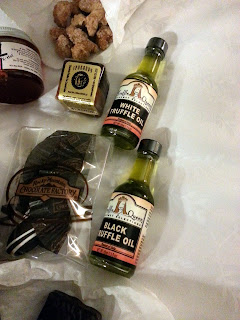
Later, after the conference wrapped up, I again returned to the Market to explore. I checked out the Rocky Mountain Chocolate shop and purchased a chocolate covered jalapeno, a dark chocolate caramel square, and was given a white chocolate and caramel dipped marshmallow. I ate the marshmallow there, saved the rest for later, and then went to check out the rest of the market. There are several levels of the market, with shops selling jewelry, wind-up toys, soaps and lotions, bags and purses, quilting supplies, trinkets from China, etc. As I wandered around and back up to the street level, I had a few more samples of produce and cheese, later trying and buying small bottles of white and black truffle oils, a pickle from Britt's Pickles, tried a $3 charcuterie sampler (with cured ham and salami samples), and picked up two large pot-stickers and some bbq pork on a stick from a Dim Sum bakery. Holy cow was I full! I just kept wandering around with my food, trying everything that was handed to me.

Great selection!


Chicken, duck, and quail eggs
Ostrich and Emu egg shells

Original Sour Pickles from Britt's

BB Butcher sampler platter

About an hour later (yes, I was still full) I met up with some friends and we wandered around to find somewhere for dinner. We ended up at Fisherman's Restaurant which was right off of Alaska on the pier with the ferris wheel. There I got a half dozen raw oysters for dinner (again, I wasn't hungry, but who can pass up inexpensive oysters?).

Yum! Oysters!

After dinner, and after hiking up many flights of stairs to get back to 1st street, we went to Chocolate and Wine on Pine. Just like it sounds, this place was a chocolate and wine shop, paired with a cupcake and ice cream shop! While there, I got an 8 oz salted caramel hot chocolate (made in store from real chocolate, homemade caramel sauce that they smeared inside the cup, salted caramel homemade marshmallows, fresh whipped cream, caramel drizzle and chocolate shavings). As I said when I took a sip, "swiss miss ain't not nothin' on this". IT WAS SO GOOD! I couldn't believe how rich and creamy the drink was and within a few minutes I was buzzing around the store on a chocolate high. Again, the staff at this place were super friendly, answering questions, explaining all their products, and even let us try some super rare cocoa-butter candy bars flavored with lemon and pepper. These bars, at $6 each for a size smaller than a Hershey bar, were so creamy and didn't really taste like chocolate. I guess they come from the cocoa fats and it's rare for anyone to sell them because most of the cocoa-butters get turned into skin care products (shame!). I also bought a Seattle souvenir chocolate bar and an caramel & chocolate fudge square.
Hot Chocolate Bar with wine tasting in the back!
Choices... hmmm
Salted Caramel Hot Chocolate
Obama Chocolates
All their chocolates come from local producers
Look at the selection!
On Sunday, I got up early to enjoy my last few hours in Seattle. My friend and I went back to the Market (can you tell how much I liked this place) and bought some pastries for breakfast. I got an almond croissant claw and gobbled that down. Again, we sampled more fruit from the produce guys, ate some dried cherries (bought two packs, one regular, one wine soaked then chocolate dipped), tried and bought some sweetened dried strawberries (then I bought a pound of them to take home) and a jazz apple, sampled some more jam, then headed over to the cheese store. At Beechers Cheeses, I bought a quarter pound of their truffle goat cheese and a quarter pound of their truffle cheddar (each were about $20/lb). We then went across the street, bought a "mini" aka 15 in long French baguette for $.1.25 and ate it with the cheese. SO GOOD. I also bought a small container of the cheese curds to take home with me.

Lunch of cheese and baguette
Then, sadly, I had to return to the hotel, get my things, and fly home. Sigh…

I will also try to post a few pictures from my friends about their food experiences in Seattle as soon as I can compile them!

Street performers
The Pike Piggy Bank
Closed up for the night
What I bought...

Candied nuts, chocolate and caramel fudge, truffle oil, 
chocolate covered jalapeno, dark chocolate caramel square

X-Hot Pepper Jelly

Squid Ink Linguine, Chocolate Pasta, and Seattle Chocolate Bar

Sweet Dried Strawberries

Dried Cherries, and Wine Soaked Chocolate Covered Cherries


Have any of you been to Seattle? What is your favorite food city? Anything I missed (I’m sure there is plenty!)? 


Such Talent!


Fish tossing