Search This Blog

Sunday, July 29, 2012

Pretzels

I've been feeling pretty absent from my blogging lately. It isn't that I haven't been baking/cooking. I have. I just haven't had time to photograph, edit, and write about my baking/cooking.

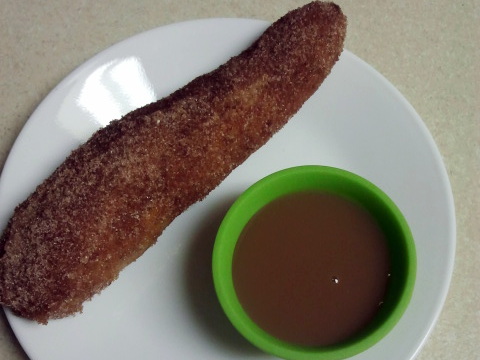
Cinnamon & Sugar Pretzel with Caramel Dipping Sauce


Its been a bit crazy over here. Since June I've traveled to Minneapolis, then home, to Wisconsin, then home, to California, the home, and wrote my thesis proposal. Again, its been a bit crazy.
California is pretty

Elephant Seal

Pacific Coastal Highway

Anyways, now that things have settled down for awhile (or at least this weekend), I'm going to tell you about my homemade soft pretzels.

A few years ago, I saw Alton Brown make his own pretzels on his show Good Eats (amazing show!!!). I was surprised to learn about how the dark brown color is achieved on pretzels. 

To get that traditional pretzel color, one must use a little chemistry. The brown color can only be accomplished by boiling the unbaked dough in water and baking soda. Something about the pH of the dough needs to be altered to get that dark coloring. If you really want to know more, watch the episode.

Soft Pretzels:

Ingredients:

  • 1 1/2 cups warm water
  • 2 tablespoons light brown sugar
  • 1 package active dry yeast (2 1/4 teaspoons)
  • 3 ounces unsalted butter, melted
  • 2 1/2 teaspoons kosher salt
  • 4 1/2 to 5 cups all-purpose flour
  • Vegetable oil
  • 3 quarts water
  • 3/4 cup baking soda
  • 1 whole egg, beaten with 1 tablespoon cold water
  • Coarse sea salt

Directions:


  1. Combine the water, sugar, yeast, and butter in the bowl of a stand mixer and mix with the dough hook until combined. Let sit for 5 minutes. (Check the expiration date on your yeast. If its like mine and over a year past its prime, you may have to add a bit more. Also, store your yeast in the fridge but take it out a bit before using it to let it wake up a bit.)
  2. Add the salt and flour and mix on low speed until combined. Increase the speed to medium and continue kneading until the dough is smooth and begins to pull away from the side of the bowl, about 3 to 4 minutes. If the dough appears too wet, add additional flour, 1 tablespoon at a time (I had to use almost 5 1/2 cups of flour because of FL humidity).
  3.  Remove the dough from the bowl, place on a flat surface and knead into a ball with your hands.
  4. Oil a bowl with vegetable oil, add the dough and turn to coat with the oil.
  5. Cover with a clean towel or plastic wrap and place in a warm spot until the dough doubles in size, about 1 hour.
  6. Preheat the oven to 425 degrees F.
  7. Bring the water to a boil in a small roasting pan over high heat and add the baking soda.
  8. Remove the dough from the bowl and place on a flat surface. 
  9. Divide the dough into 8 equal pieces, about 4 1/4 to 4 1/2 ounces each. 
  10. Roll each piece into a long rope and shape into the lengths or shapes that you want (sticks are easy and tasty).  Keep in mind the dough will puff up again in the oven so thinner is probably better.
  11. Boil the pretzels in the water solution in batches. Boil for about 30 seconds. Remove with a large slotted spoon. 
  12. Place pretzels on a baking sheet that has been sprayed with cooking spray. Make sure they are not touching. 
  13. Brush the tops with the egg wash and season liberally with the salt. 
  14. Place into the oven and bake for 15 to 18 minutes until golden brown.
  15. Add additional toppings immediately after they come out of the oven. If you want, brush on some melted butter and roll the pretzels in cinnamon and sugar. Use caramel as a dipping sauce (this is heavenly!)
With cinnamon & sugar


Regular salted

Thursday, June 28, 2012

Bumbleberry Pie


Bumbleberry Pie??? What is a Bumbleberry??? 

There is no such thing as a bumbleberry. In this case, bumbleberry refers to a bunch of yummy summer fruits: strawberries, blueberries, raspberries, blackberries, apples (kinda fall-ish, but whatever), rhubarb, peaches, apricots, etc. Pretty much any fruits you love thrown together in a pie. Yum!

   PIE!!!

Quick note: This pie crust is different than other's I've made. I usually use shortening, but this one called for butter. It was good, flaky, and didn't melt completely when being rolled out in my 80 degree kitchen. I'll probably use it again, but I still love the texture of a shortening crust. It will probably depend on the ambient temp.

Crust:

1-1/2 cups all-purpose flour
1 teaspoon salt
1 teaspoon sugar
1 cup cold butter (mine was frozen)
1/4 cup cold water

You can always double the crust recipe if you are worried about not having enough for your pan and the lattice top.
       FILLING:
1 medium tart apple, peeled and diced
1 cup diced fresh or frozen rhubarb, thawed (If you can find it. If not substitute for another fruit. I used a peach)
1 cup fresh or frozen raspberries, thawed and drained (I would use blackberries next time)
1 cup fresh or frozen blueberries, thawed and drained
1 cup sliced fresh or frozen strawberries, thawed and drained
1 cup sugar
1/2 cup all-purpose flour
1 tablespoon lemon juice

Directions:
In a small bowl, combine the flour, salt and sugar. Cut in butter until mixture ensembles coarse crumbs (This can also be done in a food processor. Just pulse until you get a fine sand like mix).
Gradually add water, tossing with a fork until a ball forms. Cover and refrigerate for 1 hour.

On a lightly floured surface, roll out half of the dough to fit a 9-in. pie plate. Transfer pastry to pie plate. Trim pastry to within 1 in. beyond edge of plate.

In a large bowl, combine the filling ingredients; pour into crust. Roll out the remaining pastry; make a lattice crust. Seal and flute edges. Cover edges loosely with foil.

Bake at 400° for 20 minutes. Reduce heat to 350°; remove foil. Bake 40-45 minutes longer or until crust is golden brown and filling is bubbly. Cool on a wire rack. Yield: 6-8 servings.


Monday, June 18, 2012

Homemade Mozzarella Cheese

Now, I think I may have crossed a line in the world of cooking. I have been making dinners and baking all sorts of craziness over the past few years, but I think making your own cheese enters you into a new level of insanity. 
So stretchy!!!


But seriously, how amazing is warm, fresh mozzarella? Creamy, stringy, rich... what's not to love. Plus, mozzarella is so versatile that you can use it in everything (that is if you don't gobble it up right away). And when you see how easy this recipe is, you'll be as tempted as I was. Its like a little science experiment happening on your stove top!


Another note: don't be scared by the foreign ingredients (you can order them on Amazon or through http://www.cheesemaking.com/cheeserennets.html) or the number of steps. If you can boil water and stir, you can handle this.

Ingredients
  • 1 gallon 2% Milk, not ultra-pasteurized (you can use whole milk but 1% or skim will make the cheese rubbery)
  • 1 1/2 tsp. Citric Acid powder, dissolved in 1/4 cup room-temperature water
  • 1/4 tsp. Liquid Rennet or 1/2 tablet Rennet, dissolved in 1/4 cup room-temperature water (I used vegetable rennet from the link above)
  • 1 tsp. Cheese (Flake) Salt or Kosher Salt
Instructions
1. Pour the milk in to a large pot (I used a large dutch oven).  On medium-low, heat slowly to 55 degrees Fahrenheit.  Stir slowly and continuously to keep from scalding.
2. Once the milk reaches 55 degrees, pour in the citric acid mixture and stir well. Keep heating. You'll probably notice the milk beginning to curdle a little.
3.  When the milk hits 88 degrees, add the rennet mixture and stir well.  Right around this time the milk will start to thicken, and you’ll see little white flecks stick to your spoon as it starts curdling.
4. Once the milk is in the 90-degree range, it should be noticeably curdled.  Stir very gently at this point, if at all — you want to encourage the curds to knit together.
5. Between 95 and 105 degrees, the curds will be quite thick. Turn off the heat once they start separating from the sides of the pot, and there’s a very clear distinction between the curds (white clumps) and whey (yellow liquid).
 Let the curds rest for 5 minutes.
7. With a perforated or slotted spoon, ladle the curds into a bowl.  The curds will continue expelling whey once they’re in the bowl, which is fine.  Once you have pulled most of the curds out of the pot (some little bits will probably still be floating about), pour any excess whey back in the pot.
 Using a microwave, heat the curds for 60 seconds.  Drain off any excess whey, then fold the curds over once, then once again.  This is to distribute the heat evenly. I would recommend using rubber gloves to hold the cheese with. Its super hot and the rubber gloves will shield your hands from the heat. It also helps to rub oil on them beforehand so that the cheese doesn't stick to the gloves.
9. Microwave again for about 30-40 seconds, depending on the strength of your microwave.  Pour off the whey.
10. Sprinkle the salt onto the cheese, and then fold the curds over twice again.  Put them back into the microwave for another 30-40 seconds.  Pour of any excess whey.
11. At this point, the cheese should be very hot, and look like melted mozzarella!
12.  Stretch the cheese, and then fold it back on itself. If it tears when you try to stretch it, the cheese is not hot enough; just repeat the microwaving process. Stretch it again once or twice. If you want a more string-cheese like cheese, do it a few more times.
13. You can then twist or braid the cheese, or tear off pieces and roll them into small balls.  If you’re going to refrigerate the cheese for later, drop it in a bowl of ice water to get the temperature down quickly. Otherwise, just dig in while it’s still warm
(My batch from 2% publix milk made about 10-12 oz of cheese)
What will you do with all this mozzarella??? 
Make Mozzarella Pesto Tomato Chicken Sandwiches!!!

Monday, May 28, 2012

Light and Dark Pinwheel Cookies

If you're anything like me, you like having a go-to recipe or two that will impress others but that is quick and simple to make. This is one of those recipes. These cookies take only a few ingredients (which you most likely have in your pantry), can be made ahead of time, and only take a few minutes to make. You also don't have to dirty more than a dish or two.

Check these out!


Light and Dark Pinwheel Cookies
1 box of chocolate cake mix
1 box of white cake mix
1 cup butter
2 eggs
Optional: Bittersweet and white chocolate chips for dipping

First, melt the butter a little. You want it to be very soft but not completely melted. Mix half the butter and one egg into each of the cake mixes. I mixed the white mix first, then the chocolate. To mix, either use a mixer or a stiff spatula or your hands (hands worked best for me and they are easy to clean) until you get a nice dough.

After both batters are mixed, roll out the chocolate dough into a large rectangle (you want it to end up around 1/2 an in thick). I put down a sheet of waxed paper to roll the dough on as well as put a piece on top the dough to keep it from sticking. Do what works for you.

Next, roll the white dough out on top of the chocolate dough. Use your hands to get the edges to line up as well as you can.

Working from the long edge, roll the dough up so that it forms a spiraled log. Wrap the dough log up in a sheet of waxed paper and place in in the fridge or freezer for about an hour. I put mine in the freezer because we keep the apartment around 80 degrees so my dough was a little warmer than most.

After chilling and getting firm, unwrap the dough an use a sharp knife to cut the log into 1/2 in thick slices. Place them on a large cookie sheet and bake at 350 for about 10 minutes.

Once the cookies are cooked and cooled, you can dip the edges into melted chocolate for an extra treat.


Enjoy!


Tuesday, May 8, 2012

French Toast Bread Pudding

I love bread pudding! I love french toast!

OMG


Warm, gooey, sweet... it smells like a fun family breakfast.

I made this recipe for Easter morning. Bread pudding recipes are great for busy families because they can be made ahead of time and popped into the oven when needed.

Another thing I like about this recipe is that the ingredients are a little more wholesome than other recipes I saw online. Most called for either tube cinnamon rolls or frozen french toast sticks. This recipe called for challah bread, which I picked up fresh from my grocery store bakery. This recipe can also be modified by using lower fat milk, light cream cheese, and low fat or sugar free maple syrup.

French Toast Bread Pudding
1 large Challah loaf, about 12oz, cut into 3/4 inch cubes, dried for several hours
7 large eggs
2 1/2 cup milk (I used 2 cups skim milk, 1/2 half and half)
1/2 cup sugar
2 tsp vanilla extract
3/4 tsp nutmeg or cinnamon (I used a little of both)

Butter or spray with cooking spray a 13x9 (or similar) size baking pan. Place the bread in the pan. Whisk eggs and the rest of the ingredients together; pour over bread. Using a spatula (or hands if you're like me) lightly press the bread into the egg mixture. Cover with foil and let it rest for at least an hour or overnight (keep refrigerated).

Place the foiled covered pan in the cold oven. Set oven to 350 and bake for 30 minutes. Remove the foil and bake for about 35 minutes until golden and puffy.

Cool for a few minutes before serving. I suggest serving it with a maple cream cheese frosting (see below)

Maple Cream Cheese Frosting
8 oz cream cheese (I used 1/3 fat), room temp
1/2 maple syrup
4-6 cups powered sugar

Optional: Chopped walnuts or pecans

In a mixer, beat the cream cheese and maple syrup together. Slowly add powered sugar cup by cup until it makes a thin frosting. Drizzle the frosting over the bread pudding. You can also add chopped pecans or walnuts if desired.


Warm from the oven, before the frosting was added

With the frosting, it soaked in more as it sat

Sunday, April 22, 2012

Samoa Bars

By this point in the spring you're going through Girl Scout Cookie withdrawal symptoms. The crunch of the cookie, the smooth caramel, texture of the coconut, and the rich drizzle of chocolate. What's not to love???


Sadly, I don't have any neighborhood Girls Scouts in my area. I did stop a group at the grocery store but without cash or check handy, I couldn't buy any (they won't trade a box for a stirring rendition of their choice of camp song). Lame.

So its been a year or two since I've had a Girl Scout cookie. Therefore, I decided I'd have to make my own.

Samoas Bars
Cookie Base:
1 cup butter (cool, not rock hard, not soft)
2 cups flour
1/2 cup powdered sugar
1/2 teaspoon vanilla

Topping:
3 cups shredded coconut (sweetened or unsweetened)
12 oz chewy caramels
1/4 teaspoon salt
3 tablespoons milk
10 oz dark or semisweet chocolate (chocolate chips)

To make the cookie base, mix the cookie base ingredients together until they stick (I use a pastry cutter). Press it into a 13x9 pan and bake at 350 degrees for 15 minutes (lightly golden).

Lower the oven temp to 300. Spread the coconut evenly into an edged baking sheet and toast the coconut for 20 minutes, stirring every 5 minutes. Continue until all the coconut is golden. Cool and set aside.

Unwrap the caramels (make sure you get all of them!) and place into a microwave-safe bowl with milk and salt. Cook on high for 3-4 minutes, stopping to stir a few times, making sure everything is heating evenly. When smooth, fold in the coconut with a spatula.

Put dollops of the topping all over the cookie base. Use the spatula to spread it into an even layer. Let the topping set until cool (you can put it in the fridge or freezer to speed this part along). Lick the bowl of caramel and coconut (this is important).

When cooled, cut the bars into ~30 bars with a sharp knife. Once cut, melt the chocolate in a small bowl in the microwave in 45 intervals, stirring to prevent scorching. Dip the base of each bar into the chocolate (I used the back of a spoon to scoop the chocolate and ran it across the bottom of each bar to get a thin, even, layer). Place onto a clean piece of parchment or waxed paper. Remelt your chocolate (you may need a little more) and put it into a piping bar or ziploc bag with the corner cut off. Drizzle the bars with the chocolate and cool to finish. Enjoy!

Look at these beauties!

Wednesday, April 11, 2012

Cabbage Rolls

I decided to make cabbage rolls for two reasons: I wanted to make something new that I had never tried, and I wanted to use cabbage in a recipe. 

Just before simmering for an hour

Neither of these were super exciting reasons, but around St. Patty's day I got it in my head that I wanted to make cabbage rolls because it was an nice traditional Irish meal (turns out its more Eastern European, but yummy all the same).

After extensive internet perusal, I found a good looking recipe on the Taste of Home website. It looked easier than most, I had everything it called for already (yay! No 4 item run to the store), and had decent reviews. In the end, I had a good time making them (even if the cabbage wasn't cooperating as well as I had hoped), I really enjoyed them, but Chris wasn't a fan (he said they were bland which is crazy). I would make them again if Chris liked them.

Don't worry about too much of a cabbage-y taste. The darker outside leaves are more cabbage-y, but the inside leaves are milder and melt more into the flavors of the filling. Serve accordingly.

Cabbage Rolls:

Ingredients

  • 1 medium head cabbage (The ingredients in red are if you want to make the tomato sauce yourself. Otherwise, just use a jar of your favorite marinara sauce. Much faster)
  • 1-1/2 cups chopped onion, divided
  • 1 tablespoon butter
  • 2 cans (14-1/2 ounces each) Italian stewed tomatoes
  • 4 garlic cloves, minced
  • 2 tablespoons brown sugar
  • 1-1/2 teaspoons salt, divided
  • 1 cup cooked rice
  • 1/4 cup ketchup
  • 2 tablespoons Worcestershire sauce
  • 1/4 teaspoon pepper
  • 1 pound lean ground beef (90% lean)
  • 1/4 pound bulk Italian sausage (I used a pound of breakfast sausage because that's what I had in the fridge and I like sausage)
  • 1/2 cup V8 juice, optional

Directions

  • In a large pot, cook cabbage in boiling water for 10 minutes or until outer leaves are tender; drain. Rinse in cold water; drain. Remove eight large outer leaves (refrigerate remaining cabbage for another use); set aside.
  • In a large saucepan, saute 1 cup onion in butter until tender. Add the tomatoes, garlic, brown sugar and 1/2 teaspoon salt. Simmer for 15 minutes, stirring occasionally.
  • Meanwhile, in a large bowl, combine the rice, ketchup, Worcestershire sauce, pepper and remaining onion and salt. Crumble beef and sausage over mixture and mix well.
  • Remove thick vein from cabbage leaves for easier rolling. Place about 1/2 cup meat mixture on each leaf; fold in sides. Starting at an unfolded edge, roll up leaf to completely enclose filling. Place seam side down in a skillet (don't worry if it doesn't look perfect. It doesn't change the taste). Top with the sauce.
  • Cover and cook over medium-low heat for 1 hour. Add V8 juice if desired. Reduce heat to low; cook 20 minutes longer or until rolls are heated through and a thermometer inserted in the filling reads 160°. Yield: 4 servings.
Yummm!
Look at how tasty these are!