Search This Blog

Monday, September 12, 2011

Busy Weekend Part 2: Skyline Chili

Its a tradition in our house (apartment, whatever) that at the beginning of the football season and/or for big games, I made skyline (Cincinnati style) chili. I make a big pot and we pig out on it all weekend. This tradition goes back to my college days when Erin's family friend gave us a big ziplock bag full of the chili and we'd eat it for the Michigan Game. Good times.


Here is the recipe. Its super easy!


Ingredients:

·         1 quart cold water
·         2 lbs ground beef
·         2 cups crushed tomato
·         2 yellow onions, diced
·         4 garlic cloves, minced
·         1 tbsp Worcestershire sauce
·         1 tbsp unsweetened cocoa
·         1/4 cup chili powder
·         1 tsp cayenne
·         1 tsp ground cumin
·         2 tbsp cider vinegar
·         1 whole bay leaf
·         1/4 tsp ground cloves
·         1 tsp cinnamon
·         1 1/2 tsp salt
-    sharp finely shredded cheddar cheese
·         cooked spaghetti, hot dogs and buns to serve chili over
-    oyster crackers
-    pinto beans (optional)

Preparation:
1.     Add beef and water to a 4-quart pot. Bring to a simmer while stirring until the ground beef is in very small pieces. Simmer for 30 minutes and add all the rest of the ingredients.
2.     Simmer on low, uncovered, for 3 hours. Add water as needed if the chili becomes to thick.
3.     Refrigerated the chili overnight, and the next day remove the layer of fat from top before reheating and serving.
The Cincinnati "Skyline" Chili Ordering Code

1-way: just the chili

2-way: chili served over spaghetti (or a hot dog)

3-way: chili, spaghetti (or a hot dog), and grated Cheddar cheese

4-way: chili, spaghetti (or a hot dog), cheese, and onions

5-way: chili, spaghetti (or a hot dog), cheese, onions, and beans

All "ways" are served with oyster crackers.

Also excellent with fritos and m&ms

These are some old photos from the dorm.  I don't know where my new photos of my chili are...

Busy Weekend Part 1: Hibiscus Tea

So it was a busy weekend in my kitchen...

I don't know where exactly I first got it in my head to make hibiscus tea, but I did. After some quick internet research I learned that I could buy dried hibiscus flowers online or in certain food stores. So on Friday night, I ventured out to the oriental market. They didn't have them. Then I went to the global market and buffet down the street. They had them (from Lebanon). Then, while I was at publix later, I found them there too. At publix, they were in the Jamaican/Haitian section (in S. FL we have a Jamaican/Haitian section next to the Asian foods).

Hibiscus flowers taste like a cross between citrus, berry, pomegranate flavors. It supposedly has some great health benefits, such as lowering blood pressure and tons of vitamin C.

To make the tea, just take about 2 cups of the dried flowers and 1/2 cup of brown sugar, and steep in 4 cups of boiling water for 10 minutes. Add another 4 cups of cold water and chill. You can also add some sliced oranges and cinnamon (many of the traditional recipes call for cinnamon sticks to be steeped with the flowers).

Yumm

This tea is pretty strong, but its also good mixed with one cup of plain green tea or cut simply with water.

Monday, September 5, 2011

Baklava

Pie crust has a fickle bitch of a girlfriend and her name is fillo dough. This stuff is something you don't want to touch unless you're in a very zen mood or have just taken a mood stabilizer. Trust me.


The first thing you need to know about fillo dough is that it has the texture of tissue paper but much more delicate. When you touch fillo dough, it tends to fall apart and it makes your finger feel thick and clumsy. 


Second, is that you have to work fast. It tends to dry out quickly so you have to put a damp cloth (I use paper towel) over it so that it doesn't dry up and get brittle. It also can't be too wet or it sticks to itself, causing it to tear. 


Also, never try to unroll the package (I'll assume you've purchased your dough, not made it from scratch. That'd be crazy) before its fully defrosted otherwise it will break into a million little piece. Been there, done that. Had to go to publix and buy another package and then wait patiently for it to thaw all the way.


Other than that (and the time factor) baklava is a joy. Well, not to make, but to eat. And wow, this stuff is good.


I got this recipe from Alton Brown's Good Eats collection after seeing his episode about how to make baklava. It was a huge help when it came to making this recipe. If you've never worked with fillo dough before, make sure you either have someone experienced at your side or watch the episode first. I'm sure you can find it on youtube.


And on a personal note, I'm pretty sure this is the first time I ever worked with fillo dough and didn't end up in a fit of swears. I'm telling you, I was zen today!


Here is the recipe (my notes are in parenthesis):


Baklava


Recipe courtesy Alton Brown, 2008
  • For the filling:
  • 1 (5-inch piece) cinnamon stick, broken into 2 to 3 pieces or 2 teaspoons ground
  • 15 to 20 whole allspice berries (~1-2 tsp)
  • 6 ounces blanched almonds
  • 6 ounces raw or roasted walnuts
  • 6 ounces raw or roasted pistachio
  • 2/3 cup sugar
  • 1/4 cup water
  • 1 teaspoon rose water (found this at Whole Foods, in the cosmetics area... look for the one that says edible... please)
  • 1 pound phyllo dough, thawed
  • 8 ounces clarified unsalted butter, melted (I needed another .25 of a stick)

For the syrup:

  • 1 1/4 cups honey
  • 1 1/4 cups water
  • 1 1/4 cups sugar
  • 1 cinnamon stick (1 tsp. I also added a little sprinkle of cloves)
  • 1 (2-inch) piece fresh orange peel

Directions

Heat the oven to 350 degrees F.
Place the cinnamon stick and whole allspice into a spice grinder and grind.
Place the almonds, walnuts, pistachios, sugar and freshly ground spices into the bowl of a food processorand pulse until finely chopped, but not pasty or powdery, approximately 15 quick pulses. Set aside.
Combine the water and rose water in a small spritz bottle and set aside.
Trim the sheets of phyllo to fit the bottom of a 13 by 9 by 2-inch metal pan. Brush the bottom and sides of the pan with butter; lay down a sheet of phyllo and brush with butter (the first sheet of dough will never be good, just come to terms with it). Repeat this step 9 more times for a total of 10 sheets of phyllo. Top with 1/3 of the nut mixture and spread thinly.
 Spritz thoroughly with the rose water. Layer 6 more sheets of phyllo with butter in between each of them, followed by another third of the nuts and spritz with rose water. Repeat with another 6 sheets of phyllo, butter, remaining nuts, and rose water. Top with 8 sheets of phyllo brushing with butter in between each sheet. Brush the top generously with butter. Place in the oven and bake for 30 minutes. Remove pan from the oven and cut into 28 squares. Return pan to the oven and continue to bake for another 30 minutes. Remove pan from the oven, place on a cooling rack, and cool for 2 hours before adding the syrup.


Make the syrup during the last 30 minutes of cooling. Combine the honey, water, sugar, cinnamon stick and orange peel in a 4-quart saucepan and set over high heat. Stir occasionally until the sugar has dissolved. Once boiling, boil for 10 minutes, stirring occasionally (careful, this will want to boil over). Remove from the heat and discard the orange peel and cinnamon stick.
After the baklava has cooled for 2 hours, re-cut the entire pan following the same lines as before. Pour the hot syrup evenly over the top of the baklava, allowing it to run into the cuts and around the edges of the pan. Allow the pan to sit, uncovered until completely cool. Cover and store at room temperature for at least 8 hours and up to overnight before serving. Store, covered, at room temperature for up to 5 days. 


This was right after I poured the syrup on

Look at all the yummy syrup (this is after it sat for ~4 hours)

Look at that sticky awesomeness!

Pay no attention to the underlining and the red text... I'm having difficulty formatting on this thing tonight.

Thursday, September 1, 2011

Nutella Marshmallow Turnovers

After making the huge batch of marshmallows, I needed something to do with them. Then I came across this recipe. NUTELLA + MARSHMALLOWS + PUFF PASTRY!!! OMG.

So I made them.


And they are amazing.

All you need for this recipe is a package of puff pastry, some marshmallows, a jar of nutella and an egg for the egg wash.


I used an Israeli version of nutella (more cocoa, less hazelnut) that was donated by Karin.
I killed the kosher-ness by adding marshmallows. 

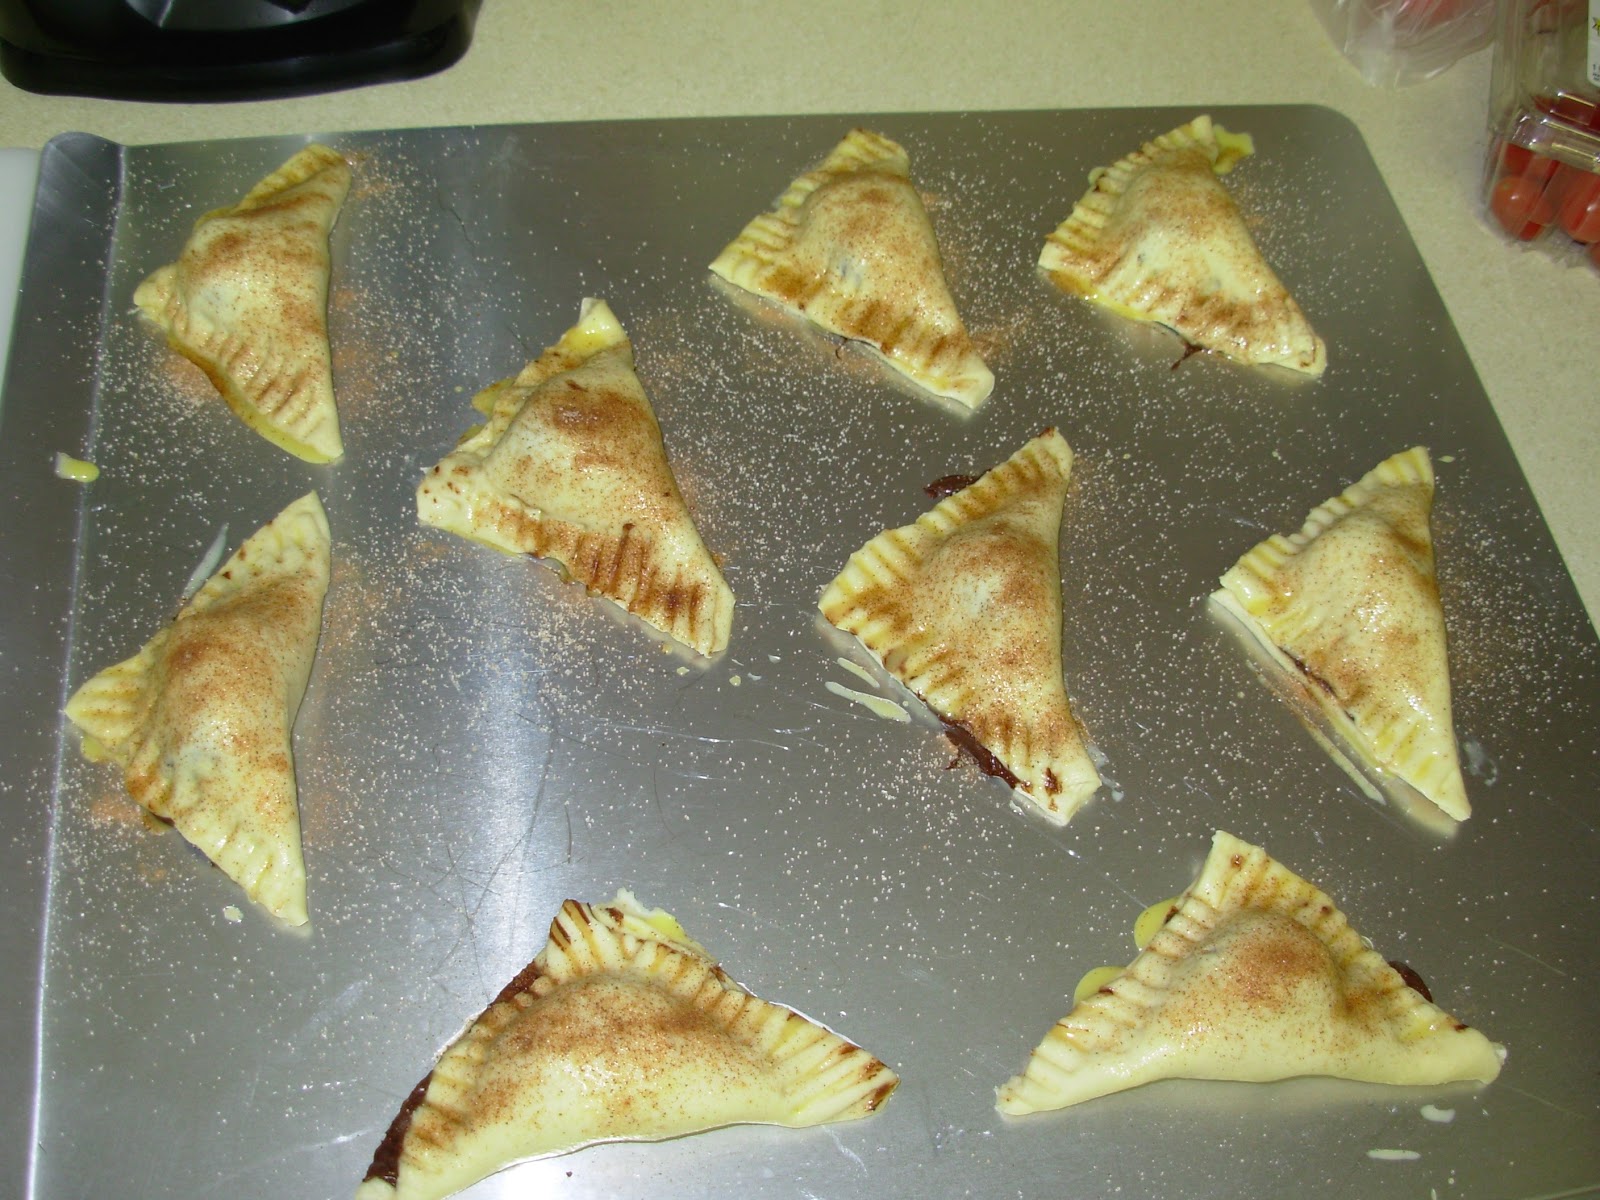
First, take the defrosted puff pastry, unfold it and slice it into squares (either 4 or 9 per sheet). Place a nice dollop of nutella in the middle, plop a marshmallow down, then fold the pastry over. Use a fork to press down on the edges. Don't worry about making it pretty, you won't see the crimping after they bake. Mix the egg with a tablespoon of water (no need to be precise... you just have to be able to spread it) and brush it onto the outside of the turnover. I sprinkled mine with cinnamon and sugar, but plain sugar works well too. Bake at 350 for 18-22 minutes until puffy and golden. Let them cool, then dig in. Or cover in caramel sauce and dig in. Either way.

 
Before baking. They got a little messy as I used "too much" nutella (which is really impossible to do. It was just a little more than my puff pastry could handle).

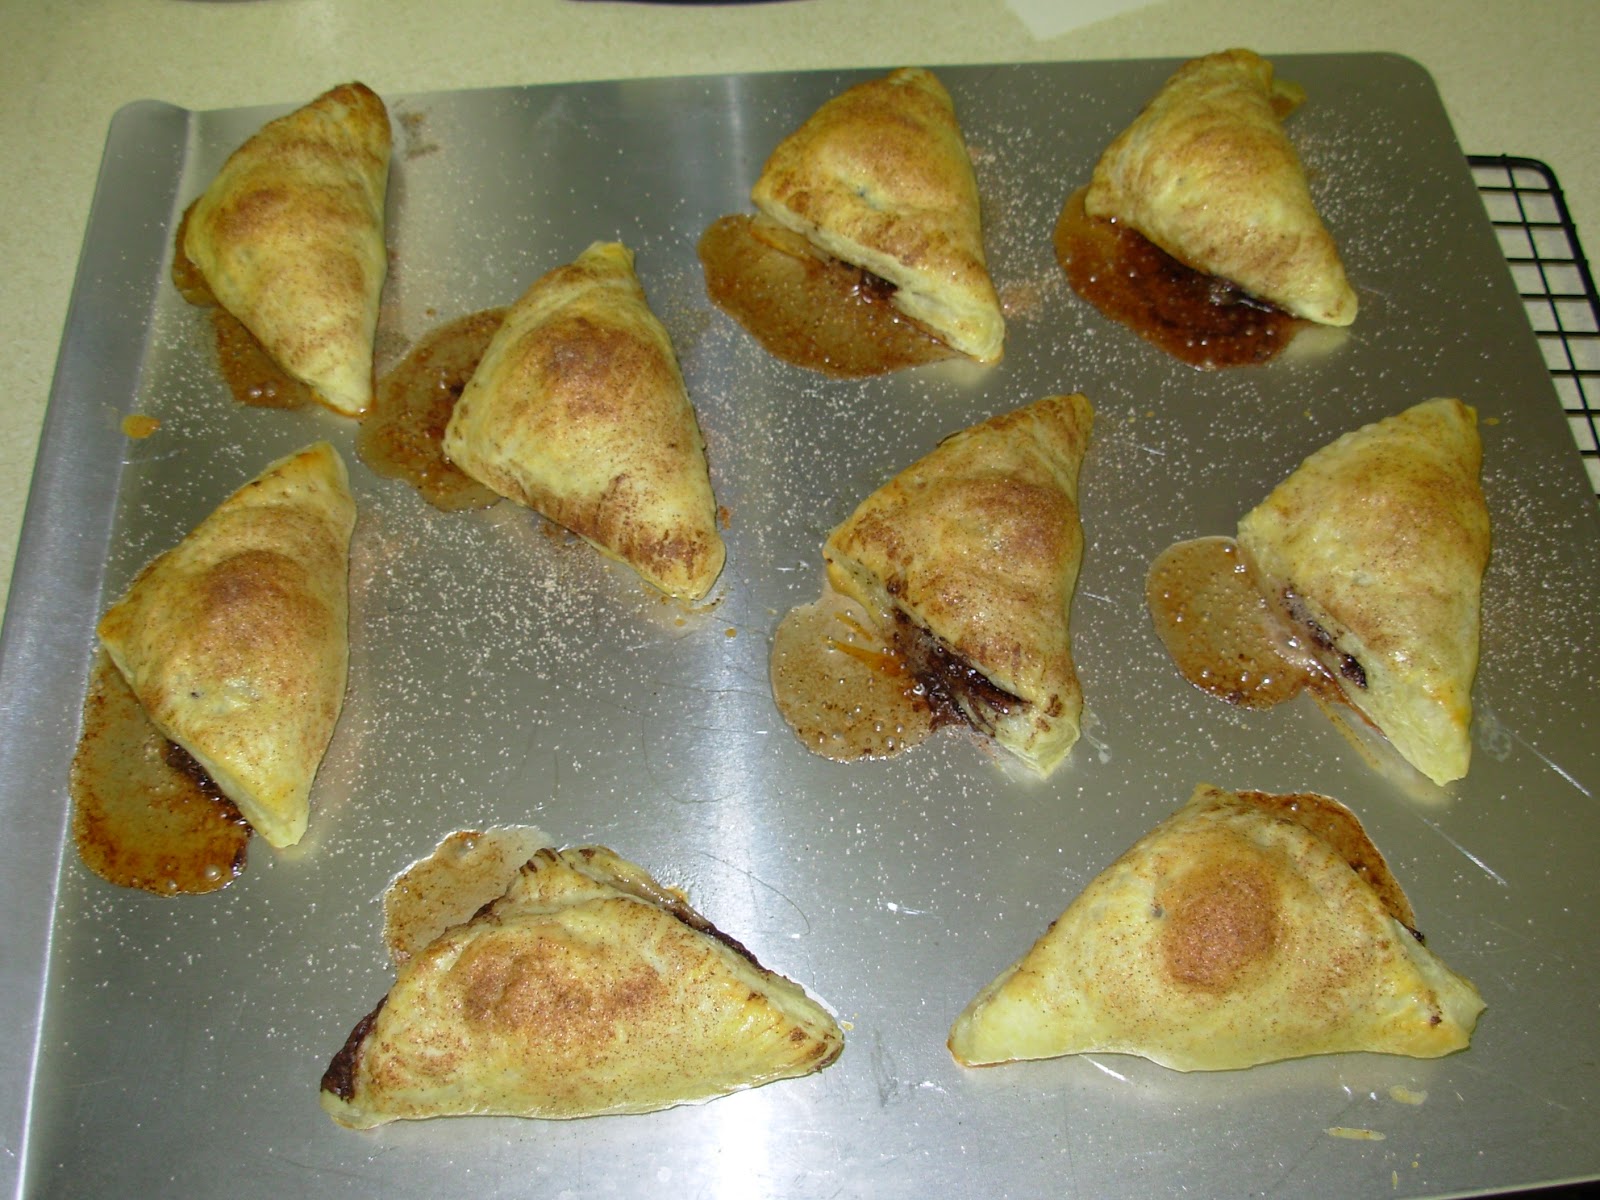
After baking. They oozed greatness


Here is the finished product. Covered in caramel. Where did the caramel come from, you ask? Here:

Hell yeah. That's a caramel cake. And also another post.

Saturday, August 20, 2011

Homemade Marshmallows: Totally worth it

August has been a busy month so far. I got to visit my family and friends in NH for the first time since I moved and then my rents, sister, and I flew to WI to visit the rest of the family. I had a great time, and I did some (mildly unsuccessful) baking and cooking, but nothing to blog about. But I'm home now and I have been thinking of some stuff to make and blog about.

At school yesterday I was talking to a few of my friends and we started talking about marshmallows and fluff. I don't know why I thought of it, but I started talking about how you can make marshmallows from scratch. I quickly pulled up a few recipes and decided to make them last night.

Long story short... marshmallows are sticky! No, seriously. VERY STICKY. Pam and powdered sugar will become your best friends if you decide to make these. But it is so worth every bit of mess. My marshmallows came out fluffy and sweet. These are the best marshmallows I've ever had.

Here is the recipe I used:


Vanilla Marshmallows
makes 20-40 depending on size

3 (1/4 ounce) packages unflavored gelatin
1 cup cold water, divided
1 1/2 cups granulated sugar
1 cup light corn syrup
1/4 teaspoon kosher salt
1 Tablespoon pure vanilla extract
Confectioners' sugar for dusting and coating

In the bowl of a stand mixer fitted with the whisk attachment, combine the gelatin with 1/2 cup of the water; set aside.

Meanwhile, combine the remaining water with the sugar, corn syrup, and salt in a small saucepan.  Cook over medium heat until the sugar dissolves.  Increase the heat to high and cook until the syrup mixture reaches 240º F on a candy thermometer. (Many of the recipes I saw said to wait for the mix to cool to 210 before continuing. I waited until it was 220 or so. I'm impatient). With the mixer on low, carefully and slowly pour the syrup into the dissolved gelatin.  Increase the speed to high and whip until the mixture is white, glossy, and very thick, about 10-15 minutes.  Reduce the speed, add the vanilla extract (oops, I added my vanilla to syrup mix. Still worked) and mix thoroughly. 

Using a fine-mesh sieve or shaker, generously (can't emphasize enough. Put a good layer down. Then add more.) dust an 8x12-inch non-metal baking dish (I used a large jelly roll pan with powered sugar on top for less mess) with the confectioners' sugar.  Pour the marshmallow mixture into the pan.  Smooth the top with an off-set spatula and dust with more confectioners' sugar. (I put a bunch of confectioners' sugar on top of the mix, put a piece of waxed paper on top, then used a rolling pin to even out the mix) Allow the marshmallows to stand uncovered overnight until it dries out (I put mine, with the top layer of wax paper removed and another layer of sugar, in the freezer overnight. That's what another recipe said to do).  
 
Turn the marshmallows out onto a cutting surface (or in the same pan, whatever) and cut them into squares or desired shapes (I used a pizza cutter sprayed with pam).  Dust the cut sides with more confectioners' sugar.  
Store the marshmallows in an airtight container or bag.


Look at these little pillows of yumminess!

I had an edge that didn't cut well so I decided to make myself a s'more (keep in mind that this was at 10:30am). I did this over my stove burner (very effective if you haven't tried this). I used nutella as the chocolate piece because I didn't have any chocolate bars. You're welcome for that idea, btw.

Oh yeah. You want it.

ENJOY!

edit: I've made these a few times since posting this recipes. I've found its sometimes easier to cut the marshmallows with a large pair of scissors. You can also cut them out in fun shapes with cookie cutters (dust them in powered sugar/cornstarch first. Also, its fun to mix in some other flavors (peppermint, almond, various liquors)  and colors (pink peppermint hearts anyone?)!

Tuesday, July 19, 2011

Caramel Filled Snickerdoodles

So, while perusing my favorite website, FoodGawker.com, I found a recipe for snickerdoodle cupcakes. These caught my eye immediately. I love a good snickerdoodle and I love taking one type of treat and making it into a cupcake (s'more, snickers, peanut butter cups, etc).


But then I realized, I've never made snickerdoodles before. Ever. At least not that I can remember. So I decided to find a good looking recipe for a basic snickerdoodle cookie on foodgawker. There were many to chose from, but when I saw the recipe for Caramel Filled Snickerdoodles, I knew what I was going to make. So here it is:


Ingredients


2 3/4 cups all-purpose flour

2 teaspoons cream of tartar
1 teaspoon baking soda
1/4 teaspoon salt
8 tablespoons (1 stick) unsalted butter
1/2 cup pure vegetable shortening
1 3/4 cups sugar, plus more if needed
2 tablespoons ground cinnamon, plus more if needed
2 large eggs
48 soft caramel candies or Rolos unwrapped

Directions


Preheat the oven to 400 degrees, with one rack in top third and one rack in bottom third of oven. Line baking sheets with Silpat baking mats or parchment paper; set aside.
Sift together flour, cream of tartar, baking soda, and salt; set aside. In the bowl of an electric mixer fitted with a paddle attachment, combine butter, shortening, and 1 1/2 cups sugar. Beat on medium speed until light and fluffy, about 2 minutes. Scrape down sides of bowl. Add eggs, and beat to combine. Add dry ingredients, and beat to combine.


In a small bowl, combine remaining 1/4 cup sugar and the ground cinnamon. Use a small (1 1/4-ounce) ice-cream scoop to form balls of the dough. Break the ball into two and place the caramel into the middle. Form one large ball and roll in cinnamon sugar. Place about 2 inches apart on the prepared baking sheets. Bake until the cookies are set in center and begin to crack (they will not brown), about 10 minutes, rotating the baking sheets after 5 minutes. Transfer the sheets to a wire rack to cool about 5 minutes before transferring the cookies to the rack. Store in an airtight container up to 1 week.


Yummmmm

Monday, July 11, 2011

Happy Belated 4th of July!

Happy Independence Day everyone!

This year for the 4th, we went to an awesome party at our friends', Janet & Terry, hanger at the Boca Airport. The invite said to bring a dish to share and, well, I love to bake & share.


There is really nothing I love more than to channel a 50s housewife and think up a few goodies to make for a party. It took me about two weeks to settle on what I was going to make, but being me, I didn't just bring one thing. Or two. I brought three.

It was overkill and there was already enough food to feel an army, but I had a blast making everything.


Here was my contribution:
Water Chestnut Stuffed Dates Wrapped in Bacon
Pepperoni Roll w/ Marinara
Caramel Chocolate Nut Bars

Oh yeah. Yummy.

The stuffed dates were easy but a bit tedious, but they were a huge hit. The whole pan was gone!
All I did was pit a big bowl of dates, stuffed them with sliced water chestnuts, wrapped them in a half slice of bacon and baked them in the oven (400 degrees, ~15-20 minutes).

The Pepperoni Roll was also pretty simple. I just took a store bought pizza crust, rolled it out into a long circle, put one layer of pepperoni down, then a layer of cheese, another layer of pepperoni and then carefully rolled it up. I gave it a wash of egg yolk before putting it in the oven to give it a nice color and sheen then cut the slices in the top so that it didn't explode. I baked it for ~20 minutes (until it looked done) at 450. I used store bought marinara sauce to dip it in. I would have take a pic of a slice, but it was gone before I could get one.


 Last, I made a recipe that I grew up with. These bars are pretty much a candy bar. Amazing. Also, I didn't have the evaporated milk I needed for the caramel mix but I learned I could use powdered milk (which I had one had from the time I made edible play-dough with the kids I babysit) mixed with a little less water to make an evap. milk substitute. Seemed to work fine.

Here's the recipe:

 Melt and Cool:
14 oz caramels (unwrapped of course)
1/2 c. evap. milk (or substitute)

Combine:
1 1/2 c. flour
1 1/2 c. oatmeal
1 c. brown sugar
1 tsp baking soda
1 c. butter

Also:
1/4 c. chopped nuts of choice
12 oz. chocolate chips

Mix the combined flour/oatmeal mix like a pie crust. Its best to use your hands and warm the butter first. Split this mix in half and put the first half into a greased 13x9. Push it and flatten it into the bottom of the pan, then bake at 350 degrees for ~10 minutes.

Sprinkle the chocolate chips onto the crust (you don't have to let it cool) then sprinkle on the nuts. Then, pour the caramel mix on top of the nuts and chocolate (be sure to leave some in the bowl for licking). Last, sprinkle on the rest of the crust mixture. It doesn't have to be even... the texture is nice. Bake for 25 minutes at 350. Then cool and enjoy!