Search This Blog

Showing posts with label Syrup. Show all posts

Tuesday, November 8, 2011

Saltwater Taffy

I don't know why I was struck by the sudden urge to make taffy, but I was. And the feeling continued for several weeks.


Taffy is funny stuff. I've never been a huge fan of taffy, but if its offered to me I'll always accept. I think I've bought it a few times, but its never a huge draw. I'm more of a chocolate girl.

I think what made me want to make taffy is the process of pulling the taffy. Having to stretch and fold the taffy over and over was really appealing. Plus, I have enjoyed experimenting with various forms of sugar work (i.e. marshmallows, syrups, etc).

To prep for this taffy-pulling-extravaganza, I found a friend crazy enough to possibly be burned my molten sugar. Ariel was the perfect candidate. Plus, she said we could make it in her kitchen (which is a plus because I've been known to make a mess or two). I also watched the Good Eats episode on taffy, you know, just in case.


Disregard our haggard appearance. We had done hot yoga just hours beforehand.


Saltwater Taffy
yields roughly 1 1/2 pounds
adapted from lorannoils.com
2 cups sugar
2 tablespoons cornstarch
1 cup light corn syrup
3/4 cup water
2 tablespoons unsalted butter, melted
1 teaspoon salt

Various extracts or flavoring oils (we used peppermint and cherry+lemon)
food coloring, optional


Prepare a shallow heat safe pan by lightly buttering it. If you plan on dividing the candy into multiple batches, prep 2-3 small pans. Have your flavorings and colorings nearby with buttered spatulas ready to stir.

Sift together the cornstarch and sugar and add to a medium thick-bottomed sauce pan (if your pan doesn't have a thick bottom, place another pan underneath. The two layers will help diffuse the heat, making it more uniform. Also, if it overflows, it won't be onto your stove burners... always a plus). Stir in the corn syrup, salt, butter and water. Place over medium heat and stir until the sugar dissolves. Once it comes to a boil, cover and cook for three minutes (turn down the temp a little so it doesn't overflow). Remove the lid and then clip on your candy thermometer and cook to 260°F.

Once the syrup hits 260°F, remove from heat and add your flavors/colors and mix well (don't inhale if you're using extracts. Unless you have a cold and are working with peppermint extract... that shit will clean out your sinuses so fast!). Then pour into your prepared pan. If you're doing multiple batches, divide the syrup between the pans and add the flavorings (we used 1-2 Tbsp of extract in each pan, but use less if you are using flavoring oils as they're stronger) and colors and then mix well.

After the flavors were mixed, cooling
Allow the candy to cool until until solid enough to handle and then butter your hands lightly and begin pulling!

You want to stretch out the taffy, bring the ends together to form a loop, stretch and repeat. Over and over. Do this for about 15-20 minutes until the taffy has a creamy, satiny appearance. All this work will incorporate air into the candy, making it soft and chewy. The more pulling the better it will be.

After pulling, roll the taffy into long ropes, and quickly snip with oiled scissors. Keep the pieces separate so they don't stick together. Roll them in squares of waxed paper to store.

Here is the taffy, just before pulling

In the beginning of the pulling process
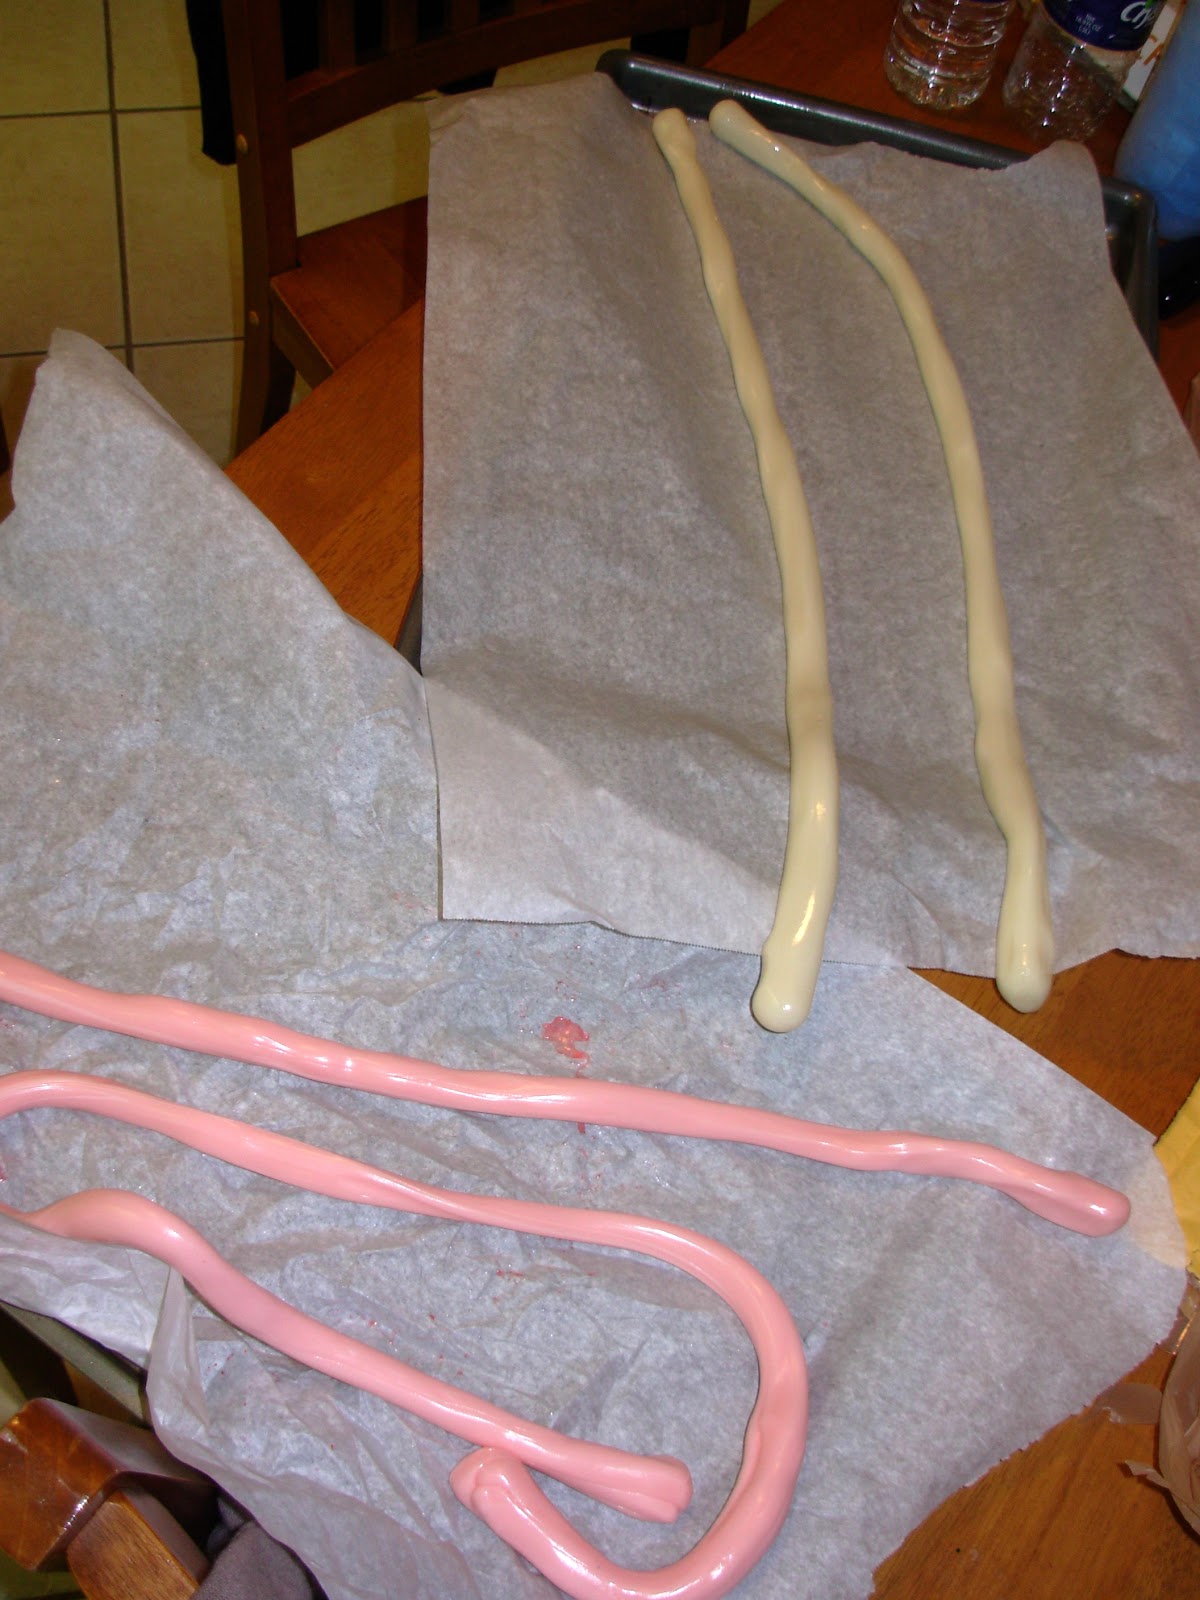
After pulling, rolled out to cut

All cut up, really to wrap
Ta-Daa! We ended up with "shirley temple" and peppermint flavored taffy

In the end, this taffy tasted great and was pretty easy to make. We didn't pull it long enough, so its pretty hard, but its great for sucking on before it softens up.

Monday, October 10, 2011

Left Over Pumpkin??? Solutions!

So you followed my post on how to make a pumpkin pie from scratch, but you're now facing a dilemma. Extra pumpkin. 


This extraneous pumpkin would not be a problem if you had enough for a second pie, but its not. You only have a little left. What are you going to do with it? It seems wasteful to throw it away. And its not something you're just going to dig into with a spoon (at least I wouldn't), or give to the dog (although mine would love that option). You want to use it purposefully.


First, figure out how much pumpkin you have left... 1 cup, 1/2 cup, just a few tablespoons? Here are a few ideas:


Mini Pumpkin Doughnut Muffins (Healthy!)
Adapted from http://kirbiecravings.com


3/4 cup sugar
1 large egg
1 1/2 cups all purpose flour
2 tsp baking power
1/4 tsp salt
1/4 tsp ground nutmeg
1/4 tsp cinnamon
1/4 cup vegetable oil (I used sugar free apple sauce)
1/2 cup fat free milk
1 tsp vanilla extract
1/2 cup pumpkin puree
Coating:
1/4 cup (1/2 stick) butter, melted
2/3 cup sugar
2 tsp ground cinnamon (go nuts on the cinnamon if you love cinnamon like I do)

directions:


1. Preheat oven to 350F. Grease mini muffin pan with pam spray.
2. In a large bowl, whisk together sugar and egg until combined. Add in flour, baking powder, salt, cinnamon and nutmeg. Mix until combined.
3. Then mix in pumpkin puree, vegetable oil, milk and vanilla extract.
4. Spoon in batter to muffin pan about 2/3 full (it will look quite runny, don't worry).
5. Bake for 12-15 minutes until toothpick inserted comes out clean. Let muffins cool before coating with cinnamon sugar.
6. For the coating. Melt 1/4 cup butter in a small glass bowl. In another small bowl, combine 2/3 cup white sugar and 2 tsp cinnamon. Dip top of donuts in melted butter (or you could go wild and do the whole thing) and then dip in the sugar mixture.

Caution: These things are addictive. You can't eat just one!

So moist and yummy!

If you have only a tablespoon or two left, this recipe is perfect. This syrup is great in coffee, chai tea, and best of all, oatmeal!

Pumpkin Syrup:
Mix anywhere from 1 teaspoon to 1 tablespoon of this pumpkin spice syrup into a mug of your favorite hot drink, depending on how sweet and pumpkin-flavored you want it.
Yields: approximately 1 1/2 cups
Prep Time: 5 minutes
Cook Time: 10 minutes
2 tablespoons pumpkin puree
1/2 cup granulated sugar
1 cup water
1 teaspoon ground cinnamon
1/2 teaspoon ground nutmeg
1/4 teaspoon ground cloves
Combine all ingredients in a small saucepan. Over low heat, bring to a simmer, stirring occasionally to keep the sugar from burning.
Simmer until the sugar is completely dissolved and the pumpkin is fully mixed into the syrup. Allow to cool for 10 minutes before transferring to an airtight container. Refrigerate and use within 3 weeks.

Monday, October 3, 2011

Vanilla Bean Cardamom Bundt Cake with Chai Tea Syrup

My future sister-in-law, Andrea, just came back from a trip to Madagascar, and she sent me whole vanilla beans. When I got them, I was SOOOO excited. I've seen vanilla beans used on cooking shows and I have always wanted to use some myself, but they tend to be pretty pricey. When I received these, my first thought was "I have to find a recipe!" This is what I came up with: Vanilla Bean Cardamom Bundt Cake with Chai Tea Syrup from http://weekofmenus.blogspot.com


You gotta smell this cake


I've never cooked with cardamom and didn't even know what to expect, and wow, its some strange stuff. I bought a jar (the stuff is pretty expensive) and got to work. Here is the recipe:


Cardamom Vanilla Bean Bundt Cake with Chai Soaking Syrup
Makes 10-inch bundt cake, serving 12 to 14

Cake
Ingredients
3 cups all-purpose flour
4 teaspoons ground cardamom powder
½ teaspoon baking powder
½ teaspoon baking soda
½ teaspoon salt
1 cup (2 sticks) unsalted butter, softened
1 cup brown sugar
¾ cup granulated sugar
4 large eggs, room temperature
1 vanilla bean, split, seeds removed (empty vanilla bean used for the syrup)
1 cup sour cream

Syrup
Ingredients
⅓ cup water
⅔ cup granulated sugar
2 chai tea bags (whatever you like)
Leftover vanilla bean pods (for extra flavor)

Method
Place rack in center of oven, and preheat oven to 350. Grease and lightly flour inside of 10 inch bundt pan.

Whisk together flour, ground cardamom, baking powder, baking soda and salt in a large bowl. Set aside.


Using either a stand mixer (paddle attachment) or a hand mixer, beat the butter at medium speed until creamy, about 2 minutes. Gradually add sugars and beat at medium-high speed until the mixture is light in texture and color, about 3 minutes. Beat in eggs one at a time, beating for 30 to 40 seconds after each addition. Scrape down sides of bowl as necessary. Beat in vanilla bean. At low speed, add flour mixture in three additions, alternating with sour cream. (Add a bit of flour, a bit of sour cream, a bit of flour, a bit of sour cream, a bit of flour.)

Scoop batter into pan and spread with spatula. Smooth with spatula.


Bake cake for 50 to 60 minutes, or until a tooth pick inserted in the center comes out clean. Cool the cake in the pan on a cooling rack for 10 minutes, then invert it onto another rack. Place the cake, on the rack, over a baking sheet.


While cake is baking, make syrup. Combine water, sugar, teabags and empty vanilla pod in a small non reactive saucepan and cook over medium heat, stirring until the sugar dissolves, 3 to 4 minutes. Remove pan from heat. Using a pastry brush, dab syrup generously all over surface of the warm cake, allowing it to soak into the cake before reapplying. Let the cake cool completely.


Finished product... yummy


Monday, September 5, 2011

Baklava

Pie crust has a fickle bitch of a girlfriend and her name is fillo dough. This stuff is something you don't want to touch unless you're in a very zen mood or have just taken a mood stabilizer. Trust me.


The first thing you need to know about fillo dough is that it has the texture of tissue paper but much more delicate. When you touch fillo dough, it tends to fall apart and it makes your finger feel thick and clumsy. 


Second, is that you have to work fast. It tends to dry out quickly so you have to put a damp cloth (I use paper towel) over it so that it doesn't dry up and get brittle. It also can't be too wet or it sticks to itself, causing it to tear. 


Also, never try to unroll the package (I'll assume you've purchased your dough, not made it from scratch. That'd be crazy) before its fully defrosted otherwise it will break into a million little piece. Been there, done that. Had to go to publix and buy another package and then wait patiently for it to thaw all the way.


Other than that (and the time factor) baklava is a joy. Well, not to make, but to eat. And wow, this stuff is good.


I got this recipe from Alton Brown's Good Eats collection after seeing his episode about how to make baklava. It was a huge help when it came to making this recipe. If you've never worked with fillo dough before, make sure you either have someone experienced at your side or watch the episode first. I'm sure you can find it on youtube.


And on a personal note, I'm pretty sure this is the first time I ever worked with fillo dough and didn't end up in a fit of swears. I'm telling you, I was zen today!


Here is the recipe (my notes are in parenthesis):


Baklava


Recipe courtesy Alton Brown, 2008
  • For the filling:
  • 1 (5-inch piece) cinnamon stick, broken into 2 to 3 pieces or 2 teaspoons ground
  • 15 to 20 whole allspice berries (~1-2 tsp)
  • 6 ounces blanched almonds
  • 6 ounces raw or roasted walnuts
  • 6 ounces raw or roasted pistachio
  • 2/3 cup sugar
  • 1/4 cup water
  • 1 teaspoon rose water (found this at Whole Foods, in the cosmetics area... look for the one that says edible... please)
  • 1 pound phyllo dough, thawed
  • 8 ounces clarified unsalted butter, melted (I needed another .25 of a stick)

For the syrup:

  • 1 1/4 cups honey
  • 1 1/4 cups water
  • 1 1/4 cups sugar
  • 1 cinnamon stick (1 tsp. I also added a little sprinkle of cloves)
  • 1 (2-inch) piece fresh orange peel

Directions

Heat the oven to 350 degrees F.
Place the cinnamon stick and whole allspice into a spice grinder and grind.
Place the almonds, walnuts, pistachios, sugar and freshly ground spices into the bowl of a food processorand pulse until finely chopped, but not pasty or powdery, approximately 15 quick pulses. Set aside.
Combine the water and rose water in a small spritz bottle and set aside.
Trim the sheets of phyllo to fit the bottom of a 13 by 9 by 2-inch metal pan. Brush the bottom and sides of the pan with butter; lay down a sheet of phyllo and brush with butter (the first sheet of dough will never be good, just come to terms with it). Repeat this step 9 more times for a total of 10 sheets of phyllo. Top with 1/3 of the nut mixture and spread thinly.
 Spritz thoroughly with the rose water. Layer 6 more sheets of phyllo with butter in between each of them, followed by another third of the nuts and spritz with rose water. Repeat with another 6 sheets of phyllo, butter, remaining nuts, and rose water. Top with 8 sheets of phyllo brushing with butter in between each sheet. Brush the top generously with butter. Place in the oven and bake for 30 minutes. Remove pan from the oven and cut into 28 squares. Return pan to the oven and continue to bake for another 30 minutes. Remove pan from the oven, place on a cooling rack, and cool for 2 hours before adding the syrup.


Make the syrup during the last 30 minutes of cooling. Combine the honey, water, sugar, cinnamon stick and orange peel in a 4-quart saucepan and set over high heat. Stir occasionally until the sugar has dissolved. Once boiling, boil for 10 minutes, stirring occasionally (careful, this will want to boil over). Remove from the heat and discard the orange peel and cinnamon stick.
After the baklava has cooled for 2 hours, re-cut the entire pan following the same lines as before. Pour the hot syrup evenly over the top of the baklava, allowing it to run into the cuts and around the edges of the pan. Allow the pan to sit, uncovered until completely cool. Cover and store at room temperature for at least 8 hours and up to overnight before serving. Store, covered, at room temperature for up to 5 days. 


This was right after I poured the syrup on

Look at all the yummy syrup (this is after it sat for ~4 hours)

Look at that sticky awesomeness!

Pay no attention to the underlining and the red text... I'm having difficulty formatting on this thing tonight.