Search This Blog

Showing posts with label chocolate. Show all posts

Sunday, March 24, 2013

Low Carb Food (even desserts!)

Hey everyone! Sorry I haven't posted in a long time (almost two months?)... its just been very busy around here. First we had Chris' parents visiting us, I had a huge exam at school, then we celebrated our 1 year anniversary in Disney World, and then had a major paper to write. All during this time, Chris and I started a low carb diet.


We aren't being super strict about it, and we aren't reading tons of Atkins books, but I'm just trying to eliminate as much bead, pasta, rice, potatoes, and sweets as I can. I'm not a big bread person, unless you bring me to a place with garlic bread or bread sticks, but I do love my pasta and rice. Especially at dinner, pasta and rice have long been a base for most of the foods I make. Dinner = pasta + sauce + meat + veggie... or rice + veggies + meat + sauce = stir-fry. What could be easier? Its been tricky trying to rework my dinner menu to be low carb, but I've figured out that I don't miss the starches all too much. 

I do however miss my sweets. I love to eat fruit and desserts. For breakfast and lunch, I love to eat fruit. But with this diet, I've tried to stick to lower sugar, high fiber fruits such as berries. But I still really miss my dessert at the end of the day (not every day, but as you know, I love to bake so a rich, special, treat now and then is really what I crave). I have allowed myself two pieces of dark chocolate after lunch (its almost an antidepressant for me) but I still was looking for some low carb baked goods. Thank god for the internet!

So to give you an idea of what we've been eating, I've been taking pictures of my dinners: 

Parmesan Chicken Tenderloins with Cauliflower Mash (with cheese and kale)

Burrito bowl: lettuce, chicken, a little quinoa, black beans, tomatoes, avocado, and cheese

Fried pork chops (yes, I used a little bread crumbs), cheddar brat, and spicy mayo kale salad

Chopped chicken stir-fry with broccoli and peas (this takes less than 15 minutes to make)

Chicken breast with sauteed mushrooms, kielbasa with collard greens, white beans, tomatoes, and spicy chicken broth

Chicken breast coated in cornstarch (less carbs than flour), with a raspberry chipotle glaze, and sauteed green beans and zucchini

Spicy Italian sausage, spicy garlic broccolini, and cloud/oopie bread (made with eggs and cream cheese... seriously)

Corned beef, cabbage and carrots (for St. Patrick's day)

Also, don't forget about my post on the wonders of Spaghetti Squash

Now, for dessert.

Dessert is a little harder to maneuver into a low carb territory due to the high sugar content of most items. But if you don't mind using a little fake sugar (don't mind if I do), its not hard to make a few great desserts.

Greek Yogurt Souffle


From: http://julesfood.blogspot.com/2012/10/greek-yogurt-souffle.html


1 cup plain greek yogurt...I use 0% Fage
3 large egg yolks
3 large egg whites
3 Tbsp AP flour
1/8 tsp salt
1 tsp vanilla extract or 1 vanilla bean (see I told you I'd give you other uses for the vanilla beans I convinced you to buy!)
1/8 tsp cream of tarter
1/4 cup sugar, or a sugar substitute like baking splenda
butter and "real" sugar for ramekins

Preheat oven to 375 F degrees, non convection.

Butter six 6oz ramekins.  Coat inside ramekin with sugar and knock out excess.  Set on baking sheet.

In a large mixing bowl whisk together yogurt, egg yolks, flour, salt and vanilla.  In a medium bowl or in your stand mixture, beat the egg whites and cream of tartar until foamy...then gradually pour in the sugar and whisk until firm, but soft peaks form...just don't whip so hard you break the whites. Add 1/3 of egg white mixture to the yogurt mixture and incorporate well.  Then, gently fold in another 1/3...then the remaining.  you want to keep as much volume as possible, of course. Divide evenly into ramekins, filled to about 3/4 to the top because when they fall you still want to have volume in the ramekin.

Bake on tray for about 15 minutes, until evenly risen and lightly browned around the edges.
DO NOT OPEN THE DOOR TO PEEK.

serve IMMEDIATELY for the full effect.
already falling, but still amazing!

These souffles are very easy to make. They remind me of a warm cheesecake. They do have a distinct 'greek yogurt' smell, but aren't as tart. We only ate two of them that afternoon, but the next day they were still so good. After they fall and cool, they are much more like a whipped cheesecake. I had mine for breakfast with blackberries. 

If you don't want to make them immediately, or you don't want all 6, you can mix them up, put them in the ramekins  and either refrigerate for two days or freeze for several months. Just bake them a few more minutes.

Approx. nutrition info
6 servings: 80 calories, 6.6 carbs, 2.5 fat, 2.3 sugar, 7.4 protein


Coconut Chocolate Mousse

adapted from: http://kojo-designs.com/2013/02/coconut-chocolate-mousse-quite-possibly-the-worlds-best-dessert/

This is another easy low carb dessert idea.


1 can of coconut milk (not lite). Some brands work better than others, but I used the first kind I found at publix (in the asian food section)

5 tablespoons of cocoa powder

2+ tablespoons of powered sugar (to taste, could probably substitute splenda because its so light)

pinch of salt (makes everything taste good, esp chocolate)

splash of vanilla extract

Directions: open the can of coconut milk and let it sit in a bowl overnight. If your can has a lot of runny coconut water on top, drain most of it off. This allows you to let the coconut solids to firm up. 

Combine the rested coconut milk with the cocoa and sugar and whip it with a mixer on a high speed until it gets fluffy (5-10 minutes). 

Time to eat! You can either spoon it into a bowl, eat it from the mixing bowl, or pipe it into fancy glasses rimmed in sugar.

These didn't taste super coconut-y but still very yummy!

Greetings from Disney World!

Thursday, October 4, 2012

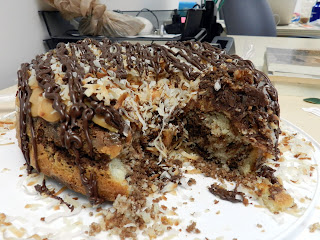
Samoa Cake


This time of the year is full of fun fall treats. But sometimes, its nice to have something other than pumpkin, ginger, and peppermint. I'm talking about something that quickly jumps into our lives at the end of the winter, making a short appearance, and than disappearing as quickly as it came. I'm talking about Girl Scout Cookies!


I was a Girl Scout for many many years. I joined as a Brownie... I think I was just entering 3 grade. In Brownies, I met some of my best friends (one of whom was my maid of honor this past spring), and after that first year I went to Girl Scout Camp. I continued though scouts way past an age where it was "cool" and  went to camp every summer. When I turned 16 I became a camp counselor and later a camp lifeguard... in total I was part of the scouts for ~13 year!
Some areas call Samoas "Caramel deLites." 
This is a travesty and there is nothing "lite" about these cookies!

Of course, along with camp-outs, silly songs, and crafts, I sold plenty of cookies. My favorites were always Samoa (purple on the order form and box) and Thin Mints (dark minty green). When the order forms arrived, the first day to sell was always a snowy day (providing pity purchases from some of our neighbors), and they arrived a few weeks later. Invariably, we ate all the cookies within a week or two (depending on how well my mom hid them). And that's one of the reason why camp was so much fun...

See, after cookies sales are done, there are always plenty of cases leftover that are given to the local camps as a special treat for the campers. Every summer, deep in the camp's freezers, there were boxes and boxes of yummy girl scout cookies!

But alas, you are not a girl scout, nor a camper. And it is many months before you will have access to their amazing (albeit expensive cookies). So what should you do??? Make a Samoa Cake!!!

Samoa Cake
1 boxed white or yellow cake (with oil/egg/water as needed)
1/4 cocoa powered (optional)
3 cups coconut
Caramel Frosting (see below)
8 oz chocolate chips


First, prepare the cake batter as directed on the box. For a marbled cake, separate the batter into two bowl (roughly in half) and add the cocoa power to one bowl, mix to combine. Layer the batter into a (oiled and floured) bundt pan, and swirl it gently together. Bake as directed. Cool for a few minutes and then gently turn it out onto a plate.

In a 300 degree oven, toast the coconut (spread onto a large pan) for about 15 minutes, checking and stirring every few minutes. Meanwhile make the caramel frosting. When the cake is cool, frost it with the caramel frosting and pat the coconut into the frosting so that it sticks. Melt the chocolate chips, and drizzle the melted chocolate over the cake (this can be done easily by putting the chocolate into a plastic baggie, and cutting the tip off to use as a disposable pastry bag).

Caramel Frosting: http://www.pauladeen.com/recipes/recipe_view/caramel_frosting/

This cake makes a mess, but it is so yummy!

Monday, May 28, 2012

Light and Dark Pinwheel Cookies

If you're anything like me, you like having a go-to recipe or two that will impress others but that is quick and simple to make. This is one of those recipes. These cookies take only a few ingredients (which you most likely have in your pantry), can be made ahead of time, and only take a few minutes to make. You also don't have to dirty more than a dish or two.

Check these out!


Light and Dark Pinwheel Cookies
1 box of chocolate cake mix
1 box of white cake mix
1 cup butter
2 eggs
Optional: Bittersweet and white chocolate chips for dipping

First, melt the butter a little. You want it to be very soft but not completely melted. Mix half the butter and one egg into each of the cake mixes. I mixed the white mix first, then the chocolate. To mix, either use a mixer or a stiff spatula or your hands (hands worked best for me and they are easy to clean) until you get a nice dough.

After both batters are mixed, roll out the chocolate dough into a large rectangle (you want it to end up around 1/2 an in thick). I put down a sheet of waxed paper to roll the dough on as well as put a piece on top the dough to keep it from sticking. Do what works for you.

Next, roll the white dough out on top of the chocolate dough. Use your hands to get the edges to line up as well as you can.

Working from the long edge, roll the dough up so that it forms a spiraled log. Wrap the dough log up in a sheet of waxed paper and place in in the fridge or freezer for about an hour. I put mine in the freezer because we keep the apartment around 80 degrees so my dough was a little warmer than most.

After chilling and getting firm, unwrap the dough an use a sharp knife to cut the log into 1/2 in thick slices. Place them on a large cookie sheet and bake at 350 for about 10 minutes.

Once the cookies are cooked and cooled, you can dip the edges into melted chocolate for an extra treat.


Enjoy!


Sunday, April 22, 2012

Samoa Bars

By this point in the spring you're going through Girl Scout Cookie withdrawal symptoms. The crunch of the cookie, the smooth caramel, texture of the coconut, and the rich drizzle of chocolate. What's not to love???


Sadly, I don't have any neighborhood Girls Scouts in my area. I did stop a group at the grocery store but without cash or check handy, I couldn't buy any (they won't trade a box for a stirring rendition of their choice of camp song). Lame.

So its been a year or two since I've had a Girl Scout cookie. Therefore, I decided I'd have to make my own.

Samoas Bars
Cookie Base:
1 cup butter (cool, not rock hard, not soft)
2 cups flour
1/2 cup powdered sugar
1/2 teaspoon vanilla

Topping:
3 cups shredded coconut (sweetened or unsweetened)
12 oz chewy caramels
1/4 teaspoon salt
3 tablespoons milk
10 oz dark or semisweet chocolate (chocolate chips)

To make the cookie base, mix the cookie base ingredients together until they stick (I use a pastry cutter). Press it into a 13x9 pan and bake at 350 degrees for 15 minutes (lightly golden).

Lower the oven temp to 300. Spread the coconut evenly into an edged baking sheet and toast the coconut for 20 minutes, stirring every 5 minutes. Continue until all the coconut is golden. Cool and set aside.

Unwrap the caramels (make sure you get all of them!) and place into a microwave-safe bowl with milk and salt. Cook on high for 3-4 minutes, stopping to stir a few times, making sure everything is heating evenly. When smooth, fold in the coconut with a spatula.

Put dollops of the topping all over the cookie base. Use the spatula to spread it into an even layer. Let the topping set until cool (you can put it in the fridge or freezer to speed this part along). Lick the bowl of caramel and coconut (this is important).

When cooled, cut the bars into ~30 bars with a sharp knife. Once cut, melt the chocolate in a small bowl in the microwave in 45 intervals, stirring to prevent scorching. Dip the base of each bar into the chocolate (I used the back of a spoon to scoop the chocolate and ran it across the bottom of each bar to get a thin, even, layer). Place onto a clean piece of parchment or waxed paper. Remelt your chocolate (you may need a little more) and put it into a piping bar or ziploc bag with the corner cut off. Drizzle the bars with the chocolate and cool to finish. Enjoy!

Look at these beauties!

Wednesday, March 28, 2012

Chocolate Praline Cake

Yummm Pralines!
And chocolate!


This is one of the easiest cakes ever. It only takes 10 minutes to put together!

Chocolate Praline Cake
1 box Devil's food cake plus the ingredients needed to make it
1/2 cup butter
1 1/2 brown sugar
1/4 whipping cream
1 cup pecans, coarsely chopped

Make the cake based on the directions on the box. Set aside.

Melt the butter in a sauce pan. Add the brown sugar and cream, stir until the sugar is dissolved. Add the pecans to the mix, and stir to combine. Pour the mixture into the bottom on a bundt pan (must use a bundt pan). Carefully pour the cake batter over the sugar and pecan mix. Bake at 350 for 40-50 minutes (or longer if needed, check with a knife). Cool for 10 minutes then invert the cake onto a platter. 
Serve with vanilla ice cream.

This was oh-so-good when warm.

Saturday, February 25, 2012

Banana Cake with Nutella Frosting

Behold the power of Pinterest. Karin found this recipe and gave me a strong hint that she thought I should make it. I took the hint.


Karin and I are both huge fans of banana cakes/breads/assorted desserts, as well as nutella. And when you put the two together... WOW.

The best thing about this cake (besides its sheer awesomeness) is that its a really easy cake to make and you can use up those overripe bananas that no one in the house will eat or that you've thrown in the freezer with good intentions (I think we all have a few black bananas in the back of our freezers).

Without further ado:

Banana Cake with Nutella Frosting (via http://thegingersnapgirl.blogspot.com)

For the cake:

2 1/2 cups all purpose flour
1 teaspoon baking soda
1 1/2 teaspoons baking powder
1 teaspoon salt
1 1/4 sticks (10 tablespoons) unsalted butter, room temperature
1 1/2 cups sugar (the original recipe call for superfine sugar, but regular worked just fine)
1 1/2 cups mashed ripe banana (about 3 large bananas)
2 large eggs
1/2 cup buttermilk
1 1/2 teaspoon vanilla extract

Preheat oven to 350 degrees F.  Line 9 x 13 cake pan with parchment paper.  Or alternatively you can butter and flour the pan, knocking off excess flour.  

In a medium bowl, whisk together flour, baking soda, baking powder and salt and set aside.  Cream butter and sugar in a stand mixer on medium speed for about 2 minutes until light and fluffy.  Add eggs, one at a time and beat on low until just combined.  Add in vanilla and mashed bananas and mix until just combined.  With mixer on low add 1/3 of the flour mixture and beat until just combined.  Add half the buttermilk.  Alternate flour and buttermilk, starting and ending with buttermilk.  Do not over mix.  Pour batter into prepared pan and bake on center rack for 35 minutes or until a toothpick inserted in the cake comes out clean.  Cool for 10 minutes in the pan and then turn cake out onto a cooling rack and remove parchment (or just leave it in the pan and serve it from there).  Allow cake to cool completely before frosting (or, if you're impatient like me, put the frosting on while its still warm and dig in. either way).

For the frosting:

3/4 stick (6 tablespoons) unsalted butter, room temperature
3/4 cup Nutella
3 cups confectioners (powdered) sugar, sifted
2-4 tablespoons heavy cream (or condensed milk) (or skim milk... with all that butter it will be fine)

In a stand mixer beat butter and Nutella on medium, about 1 minute until fully combined.  Add in confectioners sugar 1 cup at a time.  Mixture will appear crumbly.  Add in 2 tablespoons of cream and continue beating on medium-high speed for about 3 minutes.  Add additional tablespoons of cream until the frosting reaches a soft, spreadable consistency.  I used 4 tablespoons in total.  Generously spread frosting over cooled cake.  For a smooth finish, run your knife or offset spatula under hot water and gently smooth the surface, rinsing off it off after each swipe (or just dollop it on and enjoy).  

This cake is so moist and tender

warm cake, gooey frosting, large fork

Also... just to give you a peak into my valentines creations:

Home-dipped chocolate strawberries

Monday, January 30, 2012

Rum Balls

Oh rum balls. So easy. So yummy. Such a great use of baking leftovers.


Rum balls are super simple to make. First off, they're made with leftover cake. Or, if you're like me and never have this thing called "leftover cake" you can just whip up a box cake. Doesn't matter what type. Just use whatever has been sitting in the back of the pantry for the last year or two. I used a yellow cake, but enriched the favor with a few tablespoons of cocoa powder, a tablespoon or so of coffee grounds (yep, straight out of the bag. They add richness) and a few tablespoons of rum. Bake as directed on box and then let cool.


After the cake is cool, cut a piece or two, frost (leftover frosting is suggested) and eat. Now you have "leftover cake". With this leftover cake, put it into a mixing bowl, add about a cup or two of frosting (I had some white frosting from some cupcakes I made a two weeks ago and some cream cheese frosting from awhile ago). Add a little rum (I used bacardi gold) and gently mix until it forms a thick paste. Don't mix for too long. Chill the cake-paste for about an hour.

When the cake paste is cold, roll into small balls. Roll the small balls in whatever you have lying around. I used coconut, red sprinkles, and cocoa powered. You could also used diced nuts, melted chocolate, nonpareils, etc. When done, freeze overnight.

Now, eat them. 

Yummm

Thursday, January 5, 2012

Chocolate Lava Cakes

2012? When did that happen?

I can't believe how quickly 2011 went. This time last year, I was newly engaged, trying on dresses for the first time, looking at locations, and stressing about all the big wedding decisions.


My hansom puppy
Right now I'm stressing about wedding stuff, but not the big things anymore. Now I'm stressing about music selection, napkins, shoes, nail appointments, hair styles, favors, place cards, guest books, reservations, rings, and RSVP cards. And it seems like every time I check something off my list, there are 2 more things added. Just this morning I remembered that we needed to get our marriage licence. And that I have to find something for Brutus (our ring bearer) to wear that's not too formal and goes with our theme but then again he's a dog, so what does it matter, but theme is important and yadda yadda yadda.


Its really a strange feeling and I'm pretty sure I'm slowly driving all my friends crazy with all these wedding details. But at the same time, I'm pretty sure they love it. Ugh. I'm tired. I totally get why people pay big money for wedding planners. It would be nice to have someone to take care of all these details. Oh well.

So, as I buy favors, spanx, chose between two nearly identical cocktail dresses, and try to lose the last 10 lbs, I bake. And what's better than warm, gooey, chocolate cakes (because that will help with those last 10 lbs, right? Right???)?

Chocolate lava cakes are one of those impressive desserts that will stun a crowd, but are super easy to make. I've seen many recipes for them online and in cook books, but for this recipe I went straight to my trusted Betty Crocker Cookbook (New Edition). I followed the recipe nearly exactly, except that I added peppermint extract. What can I say... I can't leave well enough alone. Plus, peppermint is awesome.

Molten Chocolate Cakes

Ingredients:
Baking cocoa
6 oz semisweet baking chocolate, chopped (or chips)
1/2 cup plus 2 tbs butter
3 large whole eggs
3 large egg whites
1 1/2 cups powered sugar
1/2 cup all-purpose flour
1 1/2 tsp peppermint extract (optional but highly recommended)

Directions: (If serving immediately) Heat oven to 450 degrees. Grease bottoms and sides of six 6-oz custard cups with shortening (I used pam); dust with cocoa.

Melt the chocolate chips with the butter (microwave, stirring every 20-30 seconds), and cool slightly.

In a large bowl, beat the whole eggs and egg yolks with a whisk until well blended. Beat in 1 1/2 cups powered sugar. Beat in melted chocolate mix and the flour. Divide the batter evenly between the custard cups. Place the cups on a cookie sheet with sides (for easier removal from the oven).

Bake for 12-14 minutes, or until the sides are set and the centers are still soft (the tops will be puffed and cracked). Let stand for 3 minutes. Run a small knife along the edges of the cups to loosen. Immediately place a plate on top and flip, removing the cup. Sprinkle with powdered sugar, serve with ice cream, whipped cream, or berries. Serve warm.

If you need to, you can make the batter up ahead of time. Pour into the custard cups, cover with plastic wrap, and refrigerate for a day or two. If you do this, bake for 2-3 more minutes. Because it was just Chris and I eating them, we made two each night, and it was no problem.

With peppermint frozen yogurt, because I'm watching my weight
Enjoy! And Happy 2012!

Sunday, December 11, 2011

Peanut Butter Cup Cookies

These cookies are awesome. Who doesn't love peanut butter cups? Or peanut butter cookies?


I'll say it again: These cookies are awesome.

These are Chris' favorite cookies. But because they are his favorite and a family favorite, I always triple the recipe. While the dough is super easy to make, the cookies can take a long time to finish because you have to wait for the chocolate to cool and re-harden before removing them from the pan. If you plan to make double or triple batches, plan on borrowing a pan or two (they're made in mini-muffin tins). I have two pans of 24, but I had to go through these three times, with cooling times of about 20 minutes before removal. Just keep that in mind when you go to make these.

Peanut Butter Cup Cookies:
1/2 c. butter, softened (my recipe, from my grandma calls for Oleo)
1/2 c. sugar
1 egg
1 c. peanut butter, creamy
1/2 tsp salt
1/2 tsp baking soda
1/2 tsp vanilla
1-1 1/2 c. flour

Preheat to 375. Cream the butter and sugar together, then add the egg. Add the peanut butter. Mix the dry ingredients together and then add to the wet. Add the vanilla. Put ~1 cup of sugar in a small bowl (I use a cereal bowl). Use a small scoop to get even balls of dough, roll them in sugar, and put them dough into greased mini-muffin tins. Bake for 8-9 minutes. When done baking, push mini-peanut butter cups into each cookie. Cool in fridge or freezer until hard.


So many cookies!!! Triple recipe makes ~144 cookies


Wednesday, November 2, 2011

Chocolate Chip Pecan Pie

This recipe is a family favorite. We always had it as a Thanksgiving treat, and just like the pumpkin pie, my dad was in charge of making it. 


This pie is classic, sweet, and, oh yeah, chocolately.

Yes. I said chocolately. Our family always takes these types of things to the next level. Its like blinging out a pie. With chocolate chips.

Without further ado:

Pecan Pie
1 9in pie crust
4 tbsp butter, softened
3/4 cup light brown sugar, firmly packed
3 large eggs
1 tbsp cornstarch
1/8 tsp salt
2 tsp vanilla extract
3/4 cup dark cane or corn syrup
1 cup broken pecan pieces
1/2 cup chocolate chips


Cream the butter and sugar together until smooth. In a separate bowl, beat the eggs and then blend them into the butter mixture. Sift the cornstarch and salt into the mixture, and then add the vanilla extract. Blend in the cane syrup, followed by the pecans (and 1/2 cup of chocolate chips). Stir until thoroughly mixed. Pour into the pie crust, and float a few whole pecan halves to make a pretty design. Bake for 30 minutes at 325 degrees, then reduce temp to 300 degrees for another 30 minutes, or until center looks firm. Serve warm with vanilla ice cream.

Ta-Daa!

The recipe is good for impressing in-laws, guys, southern ladies (Paula Dean), and co-workers.

Sunday, October 23, 2011

Spaghetti Squash and Puppy Chow

So I decided to take a risk and buy a spaghetti squash to make dinner. I kept reading about how easy it was to make and how it was so tasty. Now, I'm not a big fan of squash, except sweet uses of pumpkin, but I had recently, successfully, used a butternut squash to make fries (they tasted like sweet potato fries so it wasn't a huge leap), and I was feeling adventurous.

I saw the giant pile of squash at the supermarket the other day so I bought myself a large spaghetti squash.

How did I know which of the squash in the squash pile were spaghetti squash?

That's how.

On a quick side note, you could really mess up some novice cooks by swapping all the produce stickers. "Hey, I thought this was a hot house tomato, but the sticker says yellow onion... hmmmm."

How did I know I picked a good squash from the bunch? No clue. I just picked the prettiest one from the pile. There is probably some trick to picking a good one (heavy for its size, sounds hollow, I don't know), but just go with your gut.

After you bring your squash home (and possibly fielding a few questions from the cashier), prep is simple.

1. Disregard the instruction on the sticker that use just used to identify your squash. Its done enough.
2. Place the entire squash (yes, the whole thing. No, you don't have to poke holes in it but it can explode (I've had that happen and it makes quite the mess) into the microwave and cook for 8-10 minutes.
3. Use oven mitts to remove the squash from the microwave and carefully cut it open with a large knife. The skin should be pretty soft after cooking. Let the squash cool (or burn your hands. That's what I did).
4. Use a fork/spoon/any other utensil to remove the seeds and attached strands just like you would with a pumpkin.
5. Use a fork (yes, a fork this time) to pull apart the flesh of the squash. It should easily come out in long strands. If it is still hard in places, place flat down on the plate and microwave for another minute or two. Its not critical for it to come out perfectly. 


6. Use paper towel to pat as much liquid from the squash flesh as you can.
7. Take all the squash strands and put them in a non-stick skillet and cook with a little EVOO and garlic. Keep moving it around to get it cooked through.
8. Meanwhile, heat up whatever sauce you want to use. I used jar spaghetti sauce with polish kielbasa (its a Hansen family thing), but it would also be really good with sausage or ground beef. Or you could just go simple and toss it with garlic, oil, and parm.

Cooking it up

Yummm!

Surprisingly, this was a hit with both Chris and I. The squash really has an al dente angel hair texture and works great with the spaghetti sauce. I read that it only has about 60 calories per cup (I got about 5 cups out of my one squash) and is very high in vitamin B. 

I will definitively be making it again soon!

Puppy Chow:

I was feeling pretty good about myself and my healthy dinner last night so I decided to balance it out with this yummy treat.

1 cup chocolate chips
1/2 cup creamy peanut butter
~9 cups chex cereal (I prefer crispix)
1 1/2 - 2 cup powered sugar

First, melt the peanut butter and chocolate chips together in a large glass or plastic bowl in the microwave. Mix in the chex mix, then pour it all into a large ziplock bag. Add the powered sugar, close the bag, and shake it up until all the pieces are covered. 

Then, just gobble it up!

Puppy Chow: Not for Puppies.